 |
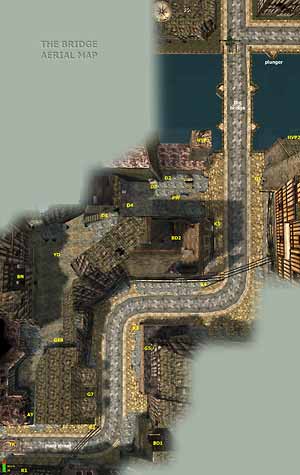
| Main Picture - Click the picture to access the aerial view of the whole "The Bridge" area and its key points. Use this map to more easily understand the walkthrough. Please, be patient. It's a large picture (around 229kb size). |
The Bridge (Day of The Tiger) - MoHAA
Introduction
You're in the last level of "Day of The Tiger" (Mission 5). You have three objectives:
This walkthrough will guide you through all these objectives. First, the usual warning: if you don't want to spoil the fun, don't read further. Find, by yourself, the best way - your way - to beat the level. But, if you're stuck, then this guide might be helpful. Try to read only enough to get you moving again. This walkthrough was done for the HARD difficulty setting.
|
Be Prepared |
The first objective can be translated into a simpler one: kill them all !!
Before sniping the Germans, you must find a high position so to have a good panorama of the bridge and be able to protect it, sniping the enemies that will try to blow it up. There are three locations that can be used for that end. If you find one of them, the next phase of the level (next objective) will start automatically.
Finding one of them seems to be the way to go, but it is not! What you must do is to get to know where the three positions are located on the map but you must not actually get inside anyone of them, or you'll trigger the next phase. Once you know all of them, you should choose the best one for each next phase. And, most important, you must kill all the enemies, on your side of the river, otherwise the next phases will be much more difficult to complete.
First things first. Let's kill all the possible enemies. But before, a warning: if a German sees you, he may try to kill you or he may try to run to the bridge to blow it up, using the plunger that is located on the other side of the river. Whenever a German starts to run in the direction of the plunger, your comrades will send you an alert, using the radio. This warning message can be one of these (there may have others):
So, if you hear any of these messages, or something similar, you must kill the enemy that is heading for the bridge because if you let him alive, he'll blow up the bridge and the mission will fail.
Note 1: to save space from screenshots, I've provided a map for the level ("a map of the map"). Take a look at the Main Picture, a big one at the end of this walkthrough, but, attention because this picture is a spoiler in itself. It is a montage of many screenshots, taken from a higher position (cheat code 'noclip' was used and luckily the weather was fine, uncloudy day - just kidding...), and it shows an almost complete view of the level. The montage is far from perfect, because it is tough to merge perspectival screenshots, but it's good enough for our purpose: to identify key points on the map. Whenever you see a symbol between a pair of brackets in this text, search for it in the map (in yellow) to know what I'm talking about.
|
Phase One: Stealthily Search |
| 1. | As soon as the level begins, CROUCH and, always walking, pass behind the tank (TK) and go to the right, enter below a building through an arched entrance. From this position (K1), you can see one German, at an alley (AY) to the left from where you started the level (pic. 1). Snipe him, head shot. Don't move. Another German will come to see what's going on. Snipe him. Be quick because the enemies on this level are rather smart and agile. Don't forget to quicksave between each important step. |
| 2. | Walk ahead just a little and take a look at your right, at the main street. Don't get out of this arched construction yet because you'll use this corner to cover you while you kill the next two enemies. You'll listen to some steps. Go back a little, stay in the same corner and, as soon as one German show up, kill him. Wait for another one: do the same and kill him. Try not to kill them while they are near the left turn of this street so to avoid that any other enemy on the other side of the street can see them dead (I found that this can trigger those enemies to get out of their original positions). Again, these two guys are agile; if you prefer, use the Thompson, with minimum head shots (pic. 2). |
| 3. | Next, head to the corner at the left turn of the main street (K2): crouched, from this position, using the Springfield, you should be able to kill three Germans: the first one on the upper balcony (G5) to the right, the second one at the opposite corner (near K3) and the third one very near you, below an arched construction (G7), to your left. Kill them all necessarily in this order. If you don't see the enemy on the balcony, he's already patrolling the full extension of it and may be out of sight; just wait until he come back. The last enemy (G7) can be killed easier using the Thompson. |
| 4. | Then, head to the next corner, at the right turn (K3). From this position, you should be able to kill two Germans, near the other corner (K4): kill one, than another will show up: kill two. |
| 5. | Now head to the next corner (always crouched and walking slowly; these Germans are very sensitive to your steps!), at the left turn (K4). Carefully, look to the door at your far right (D1), in the next and last section of the main street, through the scope. There is an enemy patrolling that building, coming in and getting out that house, through this door. Kill him (this is the 10th enemy you have killed so far). Stand still and pay attention to the sounds. If you hear steps, an enemy is coming to get you from the passageway to the left (PW); strafe carefully to the right and kill him. If anyone else comes, kill him (usually no one else should show up now). |
| 6. | Next, go to the corner to the passageway (K5). In this corner, you may listen to a mistaken alert message from your comrade. Look to the second door to the right (D3), an arched door. An enemy is patrolling that area, coming in and getting out the building through that door. When he gets out, shoot him (11th enemy). Another enemy is patrolling the house at the end of the passageway, coming in and getting out through the door (D4). Kill him (12th one). This 12th enemy may be the one that you have already killed right after the 10th one (at K4). Also, when you kill the 11th enemy, if the 12th wasn't killed yet, he will come to get you; just stand still at the corner (K5) and shoot him when he shows up (you can use the Thompson). You may prefer to kill the 12th enemy before the 11th one (using the Springfield). |
| 7. | Next, enter the house at the end of the passageway (D4). There are two enemies inside the house. Kill them. If they notice your presence, they use grenades (others also do this) and one of them may get out of the house through the back door (D5), but he comes back, just wait. When heading to this house, pay attention to the window, near the door (D4) because the enemy may eventually sees you through this window. |
| 8. | Then, head to the backdoor of the house (D5). Be careful because there are five enemies yet to kill (amounting to 19 enemies in this first part of the level). From inside the house, looking to the yard outside (YD) through that door, strafing carefully and slowly to the left, you will face four enemies (pic. 3). First, one coming from the left, the 15th one (he was originally near the alley - AY). Always using the Springfield, in scope mode, kill him. Sometimes, this 15th enemy will not show up by now. Then, strafe a little more to the left and you'll see two enemies below an arched construction: kill both (the 16th and 17th ones). Then, look up for a balcony (BN) and take down the enemy up there (18th). Note that if the 16th and 17th enemies are not aware of your presence yet, you may choose to kill the 18th first because he is always alert, very good at shooting and the direction of his shots is almost the same as the direction of the shots of the 17th enemy. After each kill, strafe right a little to take cover while your rifle is getting ready for the next shot. |
| 9. | Now, to the last enemy. Just get out of the house and head carefully to the yard. This last German is normally behind a tree, at a corner (G19). If the 15th enemy didn't show up before, he will be nearby, so kill him now. The city is clean now. |
Take your time to get to know the city. You can find ammo and health in many places. Look for them around (BD1, BD2 and the buildings that you access through D1, D2, D3 and D4). But, attention! The buildings of doors D1, D2 and D3 are actually the three possible locations with high vantage points; if you enter in just one of their uppermost floor, you'll trigger the next objective.
|
Phase Two: Protecting The Plunger |
You have to protect the plunger that is located on the other side of the river. Soon the Germans will be aware of the presence of the stolen King Tiger and they will try hard to get to the plunger and explode the bridge. The best high vantage point that I found for this phase is the building that you can access using door D2 (HVP1). This is the good news (pic. 4). The bad news is that this building will be destroyed by the enemy some time after the second objective is completed, so you'll have to get out of there and head to another high vantage point, to be able to complete the phase three. | |
| 10. | So, let's go ahead! Enter the building through door D2 and head to its uppermost floor. Select the Springfield. Reload. Quicksave the game. Do all this before heading to the hole in the wall, or the next phase will begin (pic. 5). |
| 11. | Now, hug that hole to trigger the next phase. After a while, your comrades will tell you through the radio: "Powell, look for a plunger. We believe the enemy has the bridge wired for detonation. You've got to stop them from pressing that plunger at all costs". Then the tank will start moving: "Okay sir, were moving the tank up to the bridge". From this point on, a bunch of Germans will show up, below you, running for the plunger. You have to kill them all before they can use the plunger or the mission will fail. According to my observations, you'll have to kill around seven to nine Germans. While you are protecting the plunger, you'll hear encouraging messages through the radio, like "Lieutenant, you will fail your mission if that bridge is destroyed!", "Don't let him get to that plunger!" and "We must keep that bridge intact!". Very helpful, indeed. |
What is the best strategy to protect the bridge? Here are my tips:
Reload often. The Springfield's clip carries five bullets only. There will be more than five enemies to kill, not to mention your missed shots, so you'll have to reload. Reloading the five bullets in a row is very time consuming so the trick is to reload after every one or two shots, preferably one. Three is already too risky.
Aim the plunger. The Springfield is an ideal weapon for still targets. Trying to kill moving targets may be sort of tough. The Germans are all running, so you may have difficulty trying to kill them without missing a shot. You must not miss shots. So, the solution is to keep aiming the plunger and wait for the Germans to get there. Once they get there, they stop for a while, then they have to bend over, one at a time. This is the best moment to shoot him: when the German bend over. As soon as you kill one, the next one (if near), will do the same movements: approach the plunger, stop for a while, bend over and try to use it. Of course you must not miss one shot. Since you're still, it's easy to aim right and have a good shot. If there is no German waiting in line to get to the plunger, while you're aiming there, reload right after the shot and select the scope. Note that the scope is automatically deselected, when you reload the rifle so take this chance to glance the surrounding area for enemies. In other words, you will turn all the running Germans into fixed targets.
Thompson for the first. The first German to head to the plunger will start running from your side of the river. So, to save a Springfield shot, use the Thompson to kill him and, right after, change for the Springfield. Don't try to use the Thompson for the enemies on the other side of the river: they are too far away to be a good target for that weapon.
No reload for the last ones. After you have killed three or four Germans, you won't probably need to reload again, because most likely there will be no more than five Germans left to kill. So, don't waste time reloading.
|
This phase is over when the King Tiger reaches the bridge and destroys the plunger. So, do not relax until the plunger is really destroyed. You can see it being blown up through the scope (pic. 6).
Now the bridge cannot be exploded anymore. You'll have to take care of the enemy tanks. As soon as you notice that the plunger was destroyed, QUICKSAVE. |
|
Phase Three: Calling Airstrikes |
| "Powell, the artillery is ready and Fighter Command is sending planes your way. Target enemy tanks with your binoculars and we'll take care of the rest." That's what you'll hear, but first, you must get the hell out of this building. It will be bombed and you don't have time to waste (pic. 7). |
| The King Tiger is being attacked by enemy tanks (reinforcements), on the other side of the river (note the King Tiger health at the top of the screen), and you must call in artillery strikes (pic. 8). |
| 12. | Quickload, holster your weapon and run. Don't go down using the ladder: it's time consuming. Jump down; your health will drop only two points and it's way faster. Head to the building on the other side of the main street (D1), to the next high vantage point (HVP2) that you must use. You should find no enemy to bother you on the way to the next building since you've killed them all already. Once inside, run upstairs and hug the window. Press "7" to activate your binoculars. For each enemy tank that approaches the bridge, click the Fire button to call in airstrikes and destroy that tank. The King Tiger will be also attacking the enemy tanks, but it cannot beat them all without your help, without the artillery. |
The strategy here is: be calm. With the binoculars always on, you have to pay attention to two locations only:
(a) near the destroyed plunger and
(b) at the end of the main street.
These two locations are where the enemy tanks stop to attack your King Tiger. When an enemy tank is near the spot, click Fire button. Pay attention to the messages you are receiving from the radio. When you receive messages like "Alpha-Zulu standing by" or "This is Alpha-Zulu. Waiting for a response" it means your comrades are waiting you to indicate the next target (to click Fire). When you click the "Fire" button, you must receive an acknowledgment message, like "Affirmative, coordinates received", "Got it, coordinates have been received", "That's an affirmative". Some time after, that enemy tank will be destroyed. Do not keep clicking Fire frenetically: it's useless and can bring no results. (Please, read the next topic, about respawning enemies; there are some important information there that you must know, including tips from readers on how to beat this phase)
Tip: You can actually call in airstrike before an enemy tank is in position, i.e., before it is in one of those two possible locations that the enemy tanks will stop. The trick is to call in airstrike not while looking, with the binoculars, at the moving tank, but, instead, looking at the position you know it's going to stop. With the binoculars off, you can see when a new enemy tank will arrive, coming from the street along the river or from the back street that passes at the end of the main street, so you can preview that a new enemy tank is about to stop at position (a) or (b). Before it gets there, look at its destination [ (a) or (b) ], with the binoculars on, and click Fire. Since the airstrike takes some seconds to arrive, when it comes, the enemy tank will be already in position and it will be destroyed sooner. I found that this procedure can really protect better the stolen King Tiger tank.
| 13. | The last enemy tank will be a King Tiger, the same kind of tank that you're trying to protect. When it shows up (pic. 9), a new objective appears: Destroy the enemy King Tiger". To destroy it, just use the same technique: with the binoculars on, looking to the enemy King Tiger, click the Fire button, paying attention to the messages through the radio. No secret. |
|
Are There Spawning Enemies ? |
I have received some messages from readers saying that, while they are trying to protect the plunger or to protect the King Tiger Tank (phases two and three), enemies keep climbing up the stairs to shoot at them, making it very tough to do both things at the same time: protect the targets and defend yourself against the Germans.
All I can say is that I have replayed this walkthrough some times and this never happened to me (unfortunately!!). I'd ask you, if you're under this situation, to make sure that you have killed all the nineteen enemies mentioned before trying the next phases. You must be sure that there is no enemy left alive. Based only on my own experience with the game, there wouldn't be spawning enemies at our side of town, once they are all dead (except for one or two, in the beginning of phase two, but they're heading to the plunger, and not towards your location, and they'll surely be killed by you).
But I should add some important considerations:
I'm not the guy that designed the level, I just try to be a good observer of the game and, as such, I obviously may be wrong (and, in this case, I think I am). If anyone knows how to force this situation, the spawning of enemies once they are apparently all dead, after you start phases 2 or 3, please, let me know, so I can reproduce this behaviour in my computer.
It does make sense to have spawning enemies in phases two and three. There are some clues, in the game, that can lead to this conclusion. Let's see them:
There are three high vantage points to choose from (pic. 4). Note that only HVP1 is destroyed, at the end of phase two (pic. 7). Why? Most certainly, because it was designed to be the best choice for phase two. Why the best? Because it is the higher HVP and it's very near the bridge, hence it has a great view of the plunger, and, most important, because to reach it, you must use a ladder, instead of stairs. HVP2 and HVP3 are accessed through stairs. I never saw, in Mohaa, enemies climbing up ladders, only stairs. So, if there is spawning in The Bridge mission, HVP1 would be the only spawning-free location. If this was to be the case, to try to beat phase two using other than HVP1, would be probably impossible (if the spawning worked properly in all systems). Since HVP1 is too good to be true, the designers decided to make you get out of it, by exploding it, and make you face some new enemies, to make things tougher.
HVP2, the best choice for phase three (compared to HVP3), has a lot of ammo inside. What is it for? Probably, to be used to kill the spawning enemies.
Phase three, without spawning, is ridiculously easy (even in hard difficulty mode). You just have to keep looking through the binoculars, and clicking Fire, as the enemy tanks approach. That's what I always thought about it, since I never had to face spawning enemies during the phase.
I have read a lot of messages about bugs in Mohaa, players that cannot find the perished bazooka team in Sniper Town and others that cannot find the Tiger Tank field manual in the Command Post, just to mention a few. Maybe now it's my turn to have my share of bug. Luckily, this bug wouldn't avoid me to proceed with the game.
Note 2: After receiving a lot of messages from players that did face the respawning enemies, I am convinced that my system has a bug. So, if you are facing them, follow the tips below and I'm confident that you'll get through it. Note, though, that I cannot test any of the tips below since my "The Bridge" level has no spawning enemies.
Last, is there any tip in case you're the lucky guy that's facing the spawning enemies? Since I never faced them, I cannot tell what to do so let me quote four interesting messages received from readers:
The first one (sent by Terry A., from Australia), the message that made me finally believe that my system must have a bug: "Just a quick note regarding the "The Bridge" (Mission 5). I have played this many times and on every occasions I have been attacked from behind by spawning enemies while spotting the tanks. I have definitely killed all enemies in the level before defending the bridge. Walked around the whole map a few times to make sure. The spawning enemies wear different uniforms than the initial inhabitants of the level. They wear the same cam uniforms as the spawning enemies in the "Command Post" (Mission 4) so you know they are spawning. Now what causes this if it hasn't happened to you is a mystery. What I had to do was spot one tank, turn around to deal with the two spawned guys, turn back to spot the next tank and so on. The first time I played the level I used HVP3 to protect the bridge but from there I was continually attacked by the spawning enemy also. I then used HVP2 to protect the bridge with no problems and HVP1 to spot the tanks from. It was in HVP1 that the spawning enemy kept showing up, they would be running up the stairs which I come into so if I turned around quickly after spotting a tank I could kill them while still coming up the stairs. The other thing I noticed was there was a lot of health and MG ammo in the HVP1 room. Initially I wondered what that was for but soon found out." (Thanks, Terry !!).
The second one (from Ross), with an interesting solution: "Throw a grenade down the stair. Call in airstrike. Throw grenade. Call it in, etc. etc. Bit of machine gun. BUT it was no more or less difficult if I wiped out all the enemies on my side of the bridge or not! The best place is viewpoint 2. BUT don't stand too close to the window. Back a bit means you can just glance to the right and catch enemies coming up the stair without whirling round. Also you can chuck grenades down without them bouncing back at you off the wall. The binoculars work fine back from the window a bit. The worst thing is sometimes the enemies seem to spawn right behind you in the room without coming up the stair! ... ... Another thing. I think the spawns stop once the King Tiger appears." (Thanks, Ross !!).
The third one (from Jordi Z., from Spain), with another very interesting and insightful solution: "I'd like to explain how I experienced the issue of the respawning enemies. After protecting the plunger from VP1 and the appearance of the friendly King Tiger, I always find two enemy soldiers, dressed in regular Wehrmacht uniform, the first one climbing the stairs and the second at the passageway that leads to the main street. Normally I kill them both, and then climb to VP2, but seconds after I arrive to the window and begin to direct the artillery fire I begin to be harassed by Germans, this time in Waffen-SS uniform, that climb the stairs to the room I am. But if I don't climb to VP2 and direct the artillery fire instead from the ground floor window of this same building (that also dominates both tank locations), there is no respawning." (Thanks, Jordi !!)
The fourth one (from Robert B., from U.K.): "I can confirm that I have never found more than 19 enemies in the first phase except if K2 is allowed to see you and run up the stairs in BD1 and alarm two enemies inside BD1. To trigger this, sneak up the street, on the left side. If you don't kill them all, one will run for the plunger. Also the first soldier in AY will run up the street for the plunger if you stand on the left side of the tank looking up the street. The balance of this level I have nothing to add except I found it easier to clear the courtyard and throw a grenade into the house then charge in with the Thompson. I would then backtrack to the tank and go up the street and clear the remainder finally ending up at VP1. From there I found it very easy to snipe across the river and often one shot would kill two enemies. As soon as the plunger was blown up I would quickly move back to the top of the stairs where I could site both the tanks and the enemies coming up the stairs and then it is binoculars, Thompson, back and forth, with the odd grenade for good measure, but you don't have to move. With this method I am able to complete the level in hard mode almost every time. I found it much more difficult at VP3. I don't know what to say about the respawning, like yourself I did not see it before the patch except once in the medium mode. Now I see them all the time and really without them the ending is not a big challenge. Anyway, I don't want to add confusion but the respawning is there for real and there is nothing I can do to stop them. If you are successful with this level you will kill approximately 40 enemies, with a big pile of bodies at the bottom of the stairs. One last thing, the respawning enemy generally appear in twos, double trouble!" (Thanks, Robert !!)
|
| Main Picture - Click the picture to access the aerial view of the whole "The Bridge" area and its key points. Use this map to more easily understand the walkthrough. Please, be patient. It's a large picture (around 229kb size). |
If you prefer a smaller working map (~ 81 kb), click here.
Well, "Good work Powell, your reinforcements have arrived". After you destroy the enemy King Tiger, you end the mission. Congratulations.
Obs.: The main pic and pics 4 and 7 are cheated screenshots; all others are real screenshots or cut from a real one.
|
Hope It Helped !! |
http://www.viol.net/mohaa
Version 1.00 posted on February 22nd 2002
(v.1.05 - Jun 1st, 2002)
All rights reserved. © 2002 by André Viol.