Omaha Beach - MoHAA
Warning: This is a complete walkthrough for the Omaha Beach level of Mission 3: Operation Overlord, from Medal of Honor: Allied Assault. I strongly advice you to only use this walkthrough if you are stuck into some part of this level. It will take out all the fun and surprise of discovering by yourself what is going on on that level, how to find a way to the beach, how to survive that madness, how to make it to the trench. So, you have been warned and I have washed my hands of the spoiler.
This walkthrough will guide you from the disembark all the way to the trench. You'll be able to get to the trench with almost full health. This walkthrough was done for the HARD difficulty level. I have not tested it for the medium and easy levels.
First, let's talk about some techniques that you will be using during the walkthrough:
- In some parts of the level, you will have to cross through places where there will be bombs exploding all around; always wait for the bombs to explode (normally one or two) and right after make your move; normally, after one or two explosions in a row, there will have some time of calming (for the bombs).
- When you are behind an obstacle with some mates nearby, you must stay in front of the mates, not behind them, or there will be a bigger chance that you'll be shot. Sometimes, you'll notice that the mates would avoid you from getting out of the obstacle by the better way so you'll have to go back a little to be able to run from this obstacle to the next. This is annoying but easy to bypass. Shooting your mates will not make them go away; beating them (Pistol whipping) sometimes help (although it makes me feel bad...).
- The bullets follow a certain pattern. Watch for this pattern in their ricochet in the sand and in the water, paying attention also to the sounds of the ricochets and you'll soon learn when it is the best moment to leave one obstacle and head to the next one.
- When making a big move, from one obstacle to another one far away, do not run crouched, because this will slow you down too much. It's better to stay up (un-crouch) in the very moment that you will be starting the movement, then run and, as soon as you get to your destination, crouch immediately. I will call this the stay-up-run-n-crouch technique.
- Always holster your weapon so you can run faster. You will need a weapon only at the final phase of the level.
- Always quick save in between each step described below so you can do it again in case something goes not as expected. So, do not forget to save often !!
Now, we need a legend. In the beach, there are two kinds of obstacles that you will use to protect yourself against the bullets: the ones in the form of an "X" and the ones with four legs, being three legs in one side of it and a longer leg to make the support of the obstacle. So, I'll call:
- XO: obstacle in the form of an "X";
- 4LO: obstacle with four legs;
- 3L: the three legs part of the 4LO;
- LL: the one longer leg of the 4LO;
- Hxxx: your expected health at that point.
Important notice: the screenshots that are shown here are not the real ones that you'll be experiencing during the game; these screenshots were taken using cheat codes, from a higher position, to give you a better panorama of the field (of the beach) and so to make it easier to understand where to head to.
So, let's go to the steps. You're about to disembark. Soon, you'll have to:
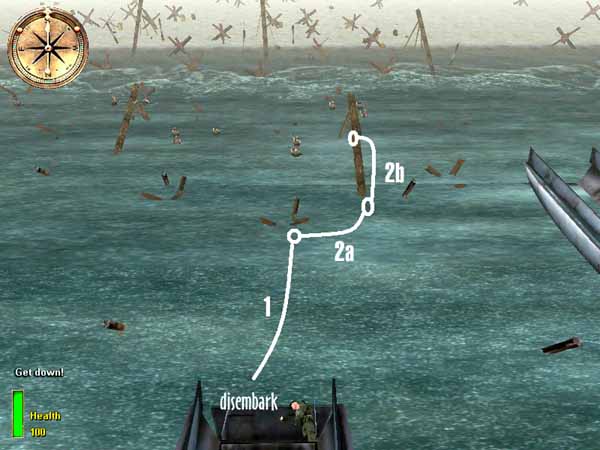
- When the door opens, RUN, holster your weapon and move straight ahead, to the first obstacle you'll see just in front of you; this obstacle looks small but it is enough to protect you. Actually, there are some obstacles in this area that look small but the fact is that these obstacles and you are inside the water, at the sea, and you are up, not crouched, because it is not possible to duck in the water. So, the obstacles and your body are in the water, that's why they seem to be small but they are not, they can protect you. Health should be 100 at the obstacle - H100.
- Move to the right, to the 1st 4LO. Stay behind the LL of this 4LO (step 2a); then, after a while, move below this 4LO and protect yourself behind its 3L (step 2b); pay attention to the bullets, when it gives a break, make the move - H100.
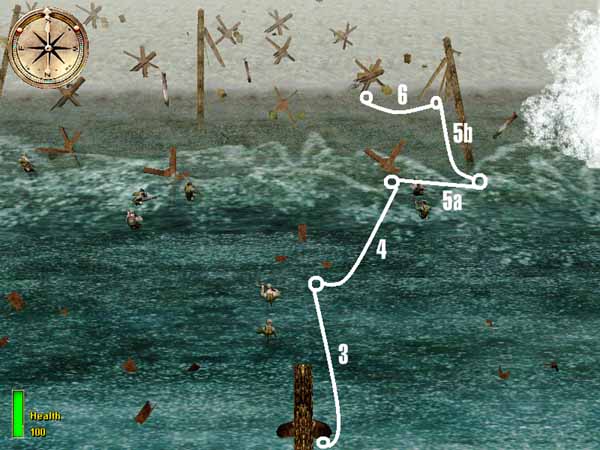
- Head to the next obstacle (a 'small' one) just in front of this 4LO - H100.
- Next, XO to the right, stay in front of your mates, not behind them, or you'll be shot - H100.
- Next, a 4LO to the right; first, protect yourself behind the LL than move behind the 3L; you're getting out of the water. Now DUCK (crouch) !!
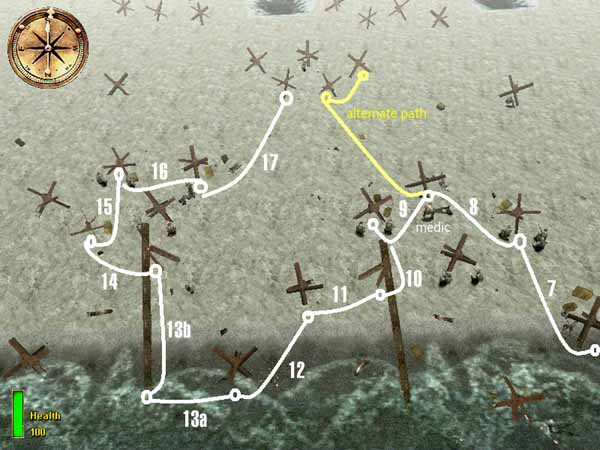
- Next, to the left, an XO near some boxes - H100.
- Next, going through the left side of the XO you're behind, go to the XO in front; you can see the medic at the XO to the left of yours - H100.
- Next, move to the XO to the left, where the medic is; stay in front of him; bombs are exploding right in front of your obstacle; you should be able to get till here with H100 but, in case you don't, the medic can give you some health so you MUST have H100 here!
- Next, the XO to the left, where there are 2 mates - H100.
- Next, a 4LO behind you; stay behind the 3L - H100.
- Next, to the XO at the left - H100.
- Next, behind, to the left, an XO (back into the water for a moment...) - H100.
- Next, to the left, a 4LO; 1st the LL, then the 3L - H100.
- Next, in front of you but to the left, where there is no mate just a helmet and some boxes - H100.
- Next, in front of you, where there are 2 mates (go through the right side of the XO from step 14) - H100.
- Now, to the XO at the right, with boxes and dead mates - H100.
- This part is tricky; go through the right side of the XO you're in step 16; in front of you there are bombs exploding; you will run to the XO in front of you (but rather far from you); you can see some XOs; look for the one that has another XO in front of it, with some mates (actually, it is the radio guy); wait for the bombs to explode and right after, stay up (uncrouch) and run; as soon as you get to the XO, crouch immediately; so, you're going to click crouch (to stay up), run and then click crouch again (to crouch); this XO you should run to is in the middle of a line of three XO that you can see from the right side of the XO in step 16; H100 !!
Shortcut 1: it is also possible to go from the XO at the end of step 8, where there is the first medic, directly to the XO at the right of the XO you'll get in the end of step 17, saving several steps (see the yellow alternate path). I found this path a little harder than the one in step 17, but even if you get to this XO without H100, soon there will be a second medic that can fill your health up; if you take this shortcut, next, head towards the XO where the radio guy is (end of step 18), if you want to hear him (just for the sake of it, because it makes no difference), or go directly to the end of step 19 and, then, follow the rest of the walkthrough normally.
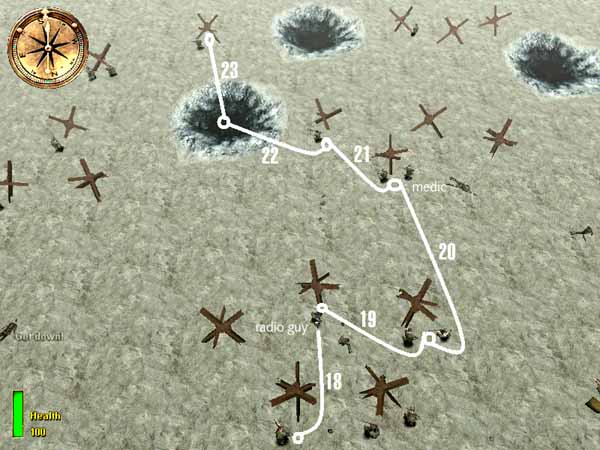
- Next, to the XO in front of you, where the radio man is - H100.
- Next, to the right, an XO with 2 mates - H100.
Note: You can try to skip step 20 by running directly to the XO where the next medic is located (end of step 20): use technique stay-up-run-n-crouch.
- Now, going through the right side of the XO you're at, go to the XO in front of you and again, use technique stay-up-run-n-crouch. Health should yet be 100 but in case it is not, there is a medic also here so, health MUST be 100 !!
- Next, to the XO at the left, where there is one mate - H100.
- Now, to the left, to a crater, stay crouched, you don't have to stay up to get there - H100.
- Now, straight ahead, towards an XO with one mate - H100.
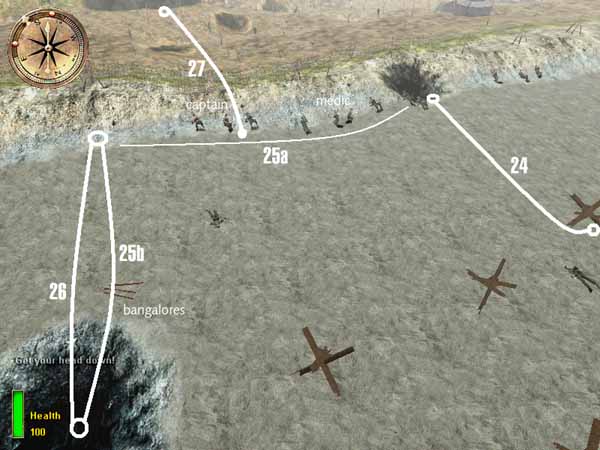
- Now, make it to the shingle! Again, stay-up-run-n-crouch; the best part to head to is to a crater in the shingle (a black part of it); again, you should be able to get there with H100 but, just in case, a medic there can boost your health in 30 points. So, you MUST have, in the shingle, H100.
- Look for the shortest path to the bangalores; stay up and run to the crater near the bangalores; don't forget to just pass on them in the way to the crater so you can acquire them; crouch as soon as you're inside the crater to stay safe - H100 !!
- The same way to bring them back. Stay up, run and crouch! It's possible to be H100, try until you manage it. The medic cannot help you anymore - H100 !!
- I found no way to get to the bunker with H100; the best I could was H80 and that's okay. To get there, just run like hell; you can go along the captain, right after the explosion of the bangalores, or wait sometime, it's up to you - H80.
- When the captain says Go!, then go! (you can wait if you want). Run to the nearer impact crater to grab the Springfield Rifle; crouch as soon as you get there! H80 !!
Now, the next steps require that you learn a new technique that is easier done than said:
- It will be called 'sync-move'. Pay attention to the two MG-42s firing at you, up the cliff. Both stop firing for a while to reload. When this happen, it is the best time for you to make your move, to run from one position to the next. If the reloading of the MG-42s are not synchronised enough, you should try to use the Springfield and snipe just one of the machine gunners up there and wait a moment. Then, verify if you were lucky enough to get a sync. If not, you must try again. Actually, it is a matter of luck and practice to get them synchronised. Normally, the two MG-42s will be already sync, when you get to the first impact crater, and you will not have to fire a single shot, all the way from the first banker to the trench. Note that a good enough sync doesn't mean a perfect sync. A good sync means no more than one second of difference between the reloadings of both MG-42s.
When you get this good sync, wait for the first MG-42 that stops firing (the other MG-42 may still be firing for one second more) and, at this very moment, use technique stay-up-run-n-crouch (holster your weapon before!), taking the path to the next destination. During the eventual last second of firing of the other MG, you will not probably be hit and the time for reloading of the MG that stopped firing earlier is enough for you to get to your next destination safe and sound. Again, note that, according to my observations, most probably you will not make use of the Springfield to kill the germans at the MG-42s; if you kill them, they respawn and you'll lose the original sync between their reloadings, what is not good at all; so refrain from the will to kill them, unless it is imperative.
What if I'm running out of ammunition and I just can't get the MG-42s synchronised enough? Then, you have two options:
- reload your last saved game and keep trying to get the sync; or,
- try an alternate technique: pay attention to one of the MG-42s; learn its reloading timing and be prepared to snipe the other MG-42; then, around one second before it stops firing, quickly snipe the other MG-42 and make the move (stay-up-run-n-crouch) to your next destination. You will be running while one MG is reloading and the other is waiting for its new gunner (spawning).
And now, back to the walkthrough!
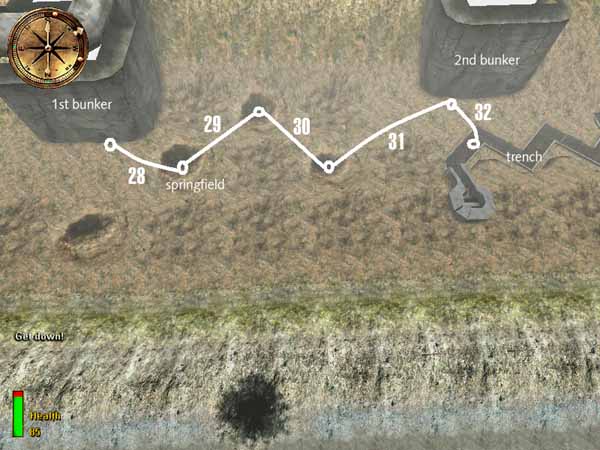
- Move to the 2nd crater. When crouched in the first crater, the path to the second crater is to pass between the two sticks ('S', in the screenshot) that you can see; use techniques sync-move & stay-up-n-run to head to the second impact crater; when in the 2nd crater, you don't need to crouch; If you use the rifle, don't forget to holster it, before running - H80.
- Head to the 3rd crater! From the second crater, you can see a mine sign ("M") at the left, then a first stick near it, to the right, then another stick more to the right and a second mine sign (at the right again). The path to the third crater is to pass between the two sticks; you can try also to pass between the mine sign to the left and its nearer stick, very close to the stick and not close to the mine sign, or a mine will explode. Use technique run-n-crouch. Holster the weapon if it was used but I may say that I didn't find a good use for it here; sniping one enemy from this 2nd crater is not easy, due to the restricted view, not to mention both (by the time you've sniped the second enemy, the first one will be already respawned, or replaced, if you prefer, thus, ready to fire at you); to use technique sync-move seems not to work here. This is a difficult step but it is possible to get to the 3rd crater with H50+ or even H80 !! Make it at least H50 because at the trench there will be only 50 points of health available !!
Shortcut 2: Since I found no easy way to go from the second impact crater to the third one (step 30), you can try a good alternate path (I'd recommend) going directly from the 1st crater to the 3rd one, turning steps 29-30 into just one. To accomplish this, you must use the same techniques sync-move & stay-up-run-n-crouch, when in the 1st crater, and head directly to the 3rd one. The path to the 3rd crater is to pass between the same two sticks you'd pass in step 29 and between the same two sticks you'd pass in step 30. H80 !!
- From this 3rd crater, you have to head to behind the second bunker. Use techniques sync-move & stay-up-n-run. You don't have to crouch, once in the second bunker. You're safe! H80 (or H50+, in the worst scenario).
- Jump into the trench and use your Springfield to kill the enemy at the machine gun; one shot is enough! Enter inside, grab ammo and make your health 100 for the rest of the level: to clear out the bunker, to eliminate the MG42 machine gunners and to exit the bunker. I'm not going to detail these objectives since they are not difficult to complete. Finish the level with H100!
 And don't forget to take a look at your medal case. You have a new one: the American Campaign Medal: for meritorious conduct in the Invasion of Normandy on June 6, 1944. Lt. Mike Powell, 2nd Ranger Bn., survived the assault on Omaha Beach and went on to clear out a major German fortification, eliminating enemy gunners, and ultimately aiding in the securing of the D-1 exit near Vierville. Congratulations.
Last but not least: there may have other ways to optimize the path shown here, making the way from the disembark to the shingle with less steps or even taking other directions. I'll leave this task for you!
http://www.viol.net/mohaa
Version 1.00 posted on February 6th 2002
(v.1.04 - feb/2002)
All rights reserved. © 2002 by André Viol.