Sniper's Last Stand - City Hall - MoHAA
Introduction
You've just proceeded to the south edge of town. You're at the second part of Sniper's Last Stand level, hard difficulty setting.
You've done the first part and now you're just thinking: "Well, I'm halfway there!". Not at all. This second part of Sniper's Last Stand is bigger and tougher than the first one, as you'll see. If Outskirts could have up to 22 enemies, City Hall can have up to around 75 enemies, not to mention the ones hidden inside the closets.
It has five objectives:
- Find the tank crew.
- Defeat the Panzer tank.
- Keep the tank crew alive and infiltrate city hall.
- Steal the King Tiger with the tank crew.
- Bring reinforcements all the way through Sniper Town.
The fifth objective is not present in your objective list (Tab key). It'll show up when you complete the level and only if you've saved at least one allied, besides the tank crew. As in the first part, there is a main objective and this would be to kill all the snipers on your way. BUT now, you're under a big unfavorable circumstance: you must protect the tank crew from enemy fire, from being dead, or the mission will fail.
The tank crew is composed of three guys: Sergeant Hammon, T/2 Engineer Campbell and T/4 Medic Glenn: they wear brighter non-green shirts. Depending on how many allies survived to the first part of the level, you may have a squad of up to eight guys with you. If you lose two guys from the tank crew, the mission fails; you can lose all the other allies, tough (the ones that made it through the first part). But, I advise you to do all the efforts needed to avoid losing them, since they play an important role helping you, by warning you about the dangers ahead and by also killing the enemies for you. So, keep them alive.
Needless to say, but all the three tips mentioned at the topic "Killing The Snipers", for the first part of this level, are valid for this second one (be patient, quicksave often and keep even expendable fellows alive). So read them again, carefully. Differently from the first part, tough, you're not going to find any other lost guy to add to your squad (like C4 and C5, at the 1st part) so, one more reason to be careful since the beginning.
|
Defeating The Panzer Tank |
|
When the level begins, the medic, from the tank crew, will meet you: "Come with me sir, the rest of the tank crew is holed up back here". So, you don't need to find the tank crew; they'll find you. Follow him and, once inside the house, go upstairs, to the right (not where the rest of the tank crew is located), to be in a place with a better view of the street.
Select the Springfield, reload it and hug the opening. With the scope on, look at the street, at a corner far away, and you'll see the first three enemies. Snipe them. Note the enemy tank coming from behind that corner, to fire at your house. Sometimes, this tank pass over some of these enemies, killing them; an improvement on their artificial intelligence would be welcome (pic. 1) .
As soon as the three enemies are dead, select the bazooka. You should have five heavy rounds for your bazooka, if you didn't waste any of them on the first part. In case you don't have at least four heavy rounds, you should pick up some, in the first room you entered (where the rest of the tank crew is located, near the stairs), prior to getting inside it. Wait until the Panzer is half on sight and fire four rounds against it. Don't waste time between shots or the tank will fire before you can defeat it. If you prefer, get back to the first room, hug any of the two windows, and fire against the Panzer from there. But it is possible to defeat it from this same location. Then, if you didn't picked up the heavy rounds before, get them now.
|
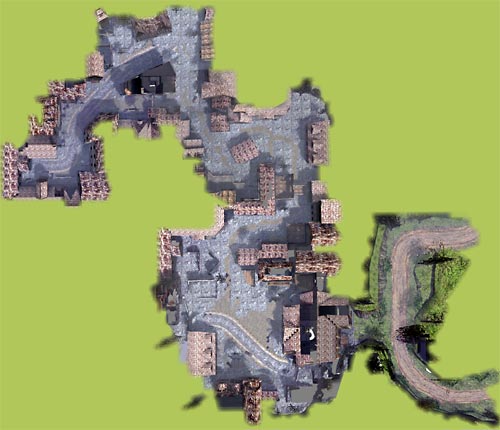
The Enemy Spots & Killing Location Map |
|
Now, it's time to kill the snipers. Well, there are many of them. Take a look at the Main Picture, at the bottom of this page: all the instructions here are referenced to this Map and its many tags. Again, read carefully the topic "The Enemy Position Map", from the first part, because all the three tips mentioned there are still valid:
- up to some degree, it's random if a given position will have or not all the enemies mentioned;
- take extreme care with the closets inside some rooms;
- the numbers indicate a suggestion of a order to kill them.
- keep an eye on the compass to get a clue about the direction of the sniper.
Some additional information, though, is necessary and may be useful.
The "S" tag - Since there are many positions to inform, the Map of this second part doesn't show the position of each enemy but, instead, the spots where the enemies will be located. A given spot can have just one enemy or more than one enemy. In case there can be more than one enemy, the maximum number of enemies are shown between brackets; in case there can be just one enemy at that specific location, there'll be no brackets near the tag. Example: "S1(3)" means the first (1) spot (S) where you're going to face enemies and, at this spot (or very nearby) there'll be three (3) enemies to kill. Another example: "S5" means the fifth spot that you should be worried about and at this spot there'll be one enemy to kill (so, no brackets). You also understand that "S" stands for Snipers, as well, if you prefer.
Follow the track - The sequence of the Spots are related to a given path that you should follow and this path is marked all along the Map using "K" tags. For instance: you're going to kill ("K") the three first enemies - "S1(3)" - (before defeating the Panzer tank) from the location marked as "K1", on the Map. Another example: you're going to kill the only enemy at Spot five ("S5") from the location marked as "K5", obviously that only after you have gone through the killings of K1 to K3.
Missing tag - Sometimes a given "K" tag will be missing, like K4. There is no "K4" on the map! This means that the two enemies at "S4(2)" should be killed from the last marked killing position, i.e., from "K3". It can also mean that the killing takes place inside the own house. In other words, "K3" is the location from where you have to kill the enemies at spot "S3(4)" and also at spot "S4(2)". "K6" takes place inside the house where "S6(2)" are.
Expect variations - Since this level has too many enemies and since a variation on your movements can trigger a different response from the enemies, sometimes you won't be able to kill the enemies as shown on the map. If this happen, you'll have to improvise a little, but do it in a way that you can return to the path shown on the map, as soon as possible. Also, if you cannot kill all the enemies from a location that you were supposed to kill them, sometimes it's better to proceed to the next killing location and try to kill him from another position (don't forget to quicksave). You'll know what this position is by paying attention to the map and also by being hit by the enemy (that's why I told you to quicksave!). Also, many enemies inside the houses tend to get outside, using the stairs or openings available, even jumping, so expect to find some of them on the streets, if you delay the killing.
The medic - This level is tougher than the first one but it has a big and worth bonus: the medic. Whenever you're hit by an enemy, if your health drops below 65%, the medic, if alive, will come near you to heal you with 50% health packs, one at a time. But you're not going to recover all your health all the times, due to the 65% limit. If you're health is, for instance, 4%, the medic will give you two health packs (one, then, after a while, the other), so you're going to be 100% again. But if your health drops between 15% and 49%, the medic will give you just one health pack because your new health will be higher than 64%; but, in this case, the final health will not be 100%. This is endless, no matter how many times you get shot, if you manage to survive, you'll be healed as described. So, the trick is: if you're really patient, while crouched in a corner, searching carefully the enemy through the scope, you will eventually (or certainly) be shot. When this happens, strafe or go back to stay away from the enemy fire and just wait the medic to heal you, then start the search again. Remember that you also have the shouts of warning from your fellows to alert you about imminent danger. Working with the healing medic and the warning fellows helps a lot. The medic also provides health packs to some of your fellows, one more reason to keep him safe. At the hard difficulty level, each enemy shot takes up to 48% from your health, so, if you have 100%, you can stand only two shots (worst scenario) before needing medic healing help; but, if your health is 70%, since the medic won't give you extra health, you can stand only one shot.
Large squad - If you have a large squad with you, many enemies will be killed by your fellows and you won't even notice there were some enemies at some locations.
|
Spots & Locations Details |
|
You already know the spots where to find the enemies and the locations from where to kill them. This information is on the Map. But, to make it easier, a brief description of each tag is now provided. Note that due to the rather random nature of the existence of the enemies on the map, the amount of them at each spot, as shown in the tags, refers to the worst scenario; so, sometimes, you're going to face less enemies than what's stated on the tag and sometimes you're not going to find the enemy on a given location. Note also that each killing requires a patient and slow search through the scope; since many enemies get out of their initial position as soon as you pass in a location from where you were supposed to see them, you may be fooled by this reaction, by thinking he's not there but, actually, he's nearby. In some cases, a run & gun approach is more adequate (generally, when I ask you to select the Thompson).
S1(3) - The three first enemies; killed from K1, before defeating the Panzer tank (pic. 1).
S2(3) - Originally inside the house, they rush down the stairs when you're at K2; kill one at a time. When heading to K3, watch the building at the left being exploded.
S3(3) - One enemy at floor level (basement of the archways), one at the first floor and one at the 2nd floor of this ruined building; from K3, you should be able to see and kill only the enemy at the first floor.
S4(2) - One at the 2nd floor, one at the 3rd floor (shoot his leg) of the Hôtel building. Kill both from K3.
S5 - At the 2nd floor of the recently bombed building. Kill from K5 (also possible from K3).
S6(2) - Select the Thompson, reload and invade the house (walk while on the streets, always). One at the first floor, another at the 2nd one. Take care with the closets on both floors.
Get out of the house and head to "K3a", always using the left sidewalk. Kill the enemy at the basement of S3.
Head to the very nearby "K3b" location and kill the last enemy at S3 (2nd floor); from this same spot, you can kill one enemy at S12, through the opening in the wall (3rd floor)
S7(3) - From K7, snipe the up to three guys that rush out of the hotel building.
S8 - Just a little ahead from K7 (= K8) (and always hugged to the wall to your right), kill the enemy at the top of the high tower.
S9 - Almost the same K8 location, but a click ahead, kill the enemy at the base of the high tower.
S10 - From K8, strafe carefully to the left a little to kill the hard to see enemy at the rooftop (pic. 2).
S11 - Select the Thompson, reload and invade the building; one enemy may be at the first floor.
S12(3) - Go upstairs and kill all the enemies on the 2nd floor; watch out the closet.
S13 - Kill the enemy at the other room of the 2nd floor; do not enter this room to kill him; this enemy may have done his way to the first room and be already dead.
S14 - You don't have to worry about S14 and S15 but in case you want to kill them all, go back to K14 to kill the enemy on the rooftop of the building with a balcony.
S15 - This guy is tough to kill. He is on the first floor of the building (where there is the balcony) and he may be in a position, inside the room, that you can kill him from K15 or even from a little to the left (on the map!) of K14; also, this guy is very good at shooting blindly. Take care.
S16 - From K15, head to the archway, but very slowly (to the right, on the map), until you see the enemy at the other side of the archway. This enemy came from the floor level of the house at S18. Kill him. DO NOT proceed on this street. Head back and go to K17 through the hotel front street.
S17 - One enemy in between buildings. Kill him from K17.
S18(3) - From K18 you'll be able to kill just the enemy under the roof (attic).
S19 - Strafe just a little to your left (or to the right, if you're looking at the map), keep looking at the third floor of the hotel building, to an opening, and kill the enemy there as soon as you see him or he'll get out of his position making it difficult (pic. 3). You must not receive an automatic "Game saved" message (saved as "Sniping from below"; if you did, something went wrong (you were in the wrong position); start again from your last manual saved game. When the game is automatically saved, some new enemies are created and you'd better of without them until now.
Head to "K18a", near a tree, then head to "K18b"; walk slowly until you get the automatic "Game saved" message I talked about. Stop! You've just crossed the "Sniping from below" frontier. Look at S18 and kill one enemy at the 1st floor, near a window.
Stay quiet, don't move, and aim the scope to S20, through some bushes; wait just a moment and one enemy coming from the house at S20 will show up. Quickly kill him.
Scope back to S18, first floor, through the opening. Walk just a little ahead and kill the last enemy there.
S21(3) - Select the Thompson, reload and head to the house. Climb up the stairs and invade the house, killing the three enemies inside. Take care with the closet. Also, one of the enemies may get out of the house before you get there. Be careful but be quick. They throw grenades and the best tactics is to kill them quickly to avoid the grenades.
S22 - When getting out of S21, stop at the stairs; from K22, kill the enemy through the opening in the other house.
S23 - When crossing the street, keep looking through the scope to the roof of S23. There is an enemy on top of it. Move very slowly but once you see him, be quick to shot him or he'll get out of his position. If so, wait a moment because he'll be back.
Now, it's a good moment to pay a visit to S18, but take care with the closet on 1st floor.
S24 - Select the Thompson, enter the house through the stairs and kill the guy inside the house. Take care with the closet.
S25 - Get out of the house through its opening and from K25, kill the guy at that corner, near a tree.
S26 - From K26, kill the enemy at the first floor of the building with archways, middle window.
S27 - From K27, kill the guy in between those buildings, on top of the wall.
S28(3) - Head to K28, a corner under the first floor of that building (pic. 4). Wait until the three enemies show up and ambush them, one at a time. If they don't show up, walk ahead a little to the next corner, under the same house, yet, and look carefully to your right; they should be coming. If the third one doesn't show up, just walk out of this corner, taking the right, hugging the wall, until you see him; he's nearby. Do not go further than the last corner of this building, near the tree. And yes, the map is right: these enemies came from the other side of the next building; they've walked a lot just to die.
S29 - From K9, shoot the guy on the rooftop.
S30 - From K30, shoot the guy on the middle of the bridge.
S31(3) - Now, go to the track, select the Thompson, reload and start walking slowly ahead until you see two enemies to pass running on the bridge, from the left to the right. Do not shoot yet! Stop and wait for a third enemy to get out of that building, through the stairs, right in front of you, on the street. Shoot him and head to the door; from there, you should be able to kill the two guys that were running on the bridge. Take care because they throw grenades and one of them can be climbing down the stairs or may be on the bridge yet, throwing grenades. Invade the building and kill them: there are some alternate ways to deal with these three guys. Do not stand still on the middle of the stairs or the enemy at S32 can shoot you. The 1st floor ruined room has a closet but I never saw any enemy to get out of there, so far.
S32 - From K32, using the door as a cover, kill the enemy at the 2nd floor, middle window.
S33(2) - When entering the bridge, strafing to the left from K32, take care with an enemy at the first floor, to the right of that building. Kill him from K33.
Now, visit the room where S32 should be dead. Take all the way back to the street and head to position K33a. From there, kill the enemy at the 2nd floor of the same S33 spot. He's now to the left of the building.
S34(2) - Slowly head to K34, looking through the scope to the balcony ahead. Two guys will show up. Kill them. You've just crossed the "Moving on the King Tiger" line. After, if you want, you can enter a door to the left to visit the room where S33(2) were located but do not go any further, into the City Hall. I found it tougher to invade the city hall using this shortcut.
S35 - Get out of S33, back to the street, and head to K35, always close to the wall of the building to your right. From there, with the scope on, walk slowly to K36 but keep aiming at the direction of S35, that is on the street, behind some bushes (pic. 5). When you see him (if he's there), kill him. Two shots of Springfield are needed since the enemy is far away.
S36 - When close to K36, aim to S36, at the second floor of the badly ruined building with fire, and kill the guy up there.
S37 - A little further, from K37, you should be able to see, through the scope, and kill the enemy at the first floor.
S38 - Now crouch and walk around the corner, to the left, to the next corner at K38. Kill the enemy at the main entrance door of the city hall.
S39 - Walking very slowly, hugged to your right wall, to the next corner, K39. Use the corner to strafe carefully until you see the enemy inside the city hall, through an opening. Kill him.
S40 - Don't move. Stand up and just look up; you should be able to see and enemy at the balcony ahead. If necessary strafe very carefully to your right, hugged to the same wall. Kill him before he notices you and get out of his initial location.
S41 - From the same location, look through the scope and kill the guy at floor level, in between two damaged buildings, far away. Two shots may be needed.
S42 - Just a little ahead, from K42, you should be able to kill a second enemy at the right side of the balcony.
S43 - Very nearby, from K43, kill the enemy at the second floor of that building.
S44(3) - Now, you're going to infiltrate city hall. There are 13 enemies guarding it (one inside a closet, not accounted on the map). You have killed two of them (S38 and S39). There are 11 to go. Select the Thompson, reload and quicksave. Approach the side entrance, walking, and stop at K44. Wait. Soon, up to three enemies will rush out of city hall, through this side entrance, one at a time. You can hear their steps on the wooden floor of city hall. Just kill them as they show up. Then, enter city hall and complete the next objective. Take care because there may have one enemy left, on a corner, at the right, inside this room. If any enemy gets out of city hall by the main entrance, while you're waiting the enemies, your fellows should take care of him, but this rarely happens. If anything goes wrong, start it again.
S45(7) - Inside this first room, head to the door (pic. 6) and from that position, using the door as a cover, throw some grenades into the room ahead, to make the germans move. Kill them as they show up. Take care because they are quick and good at shooting even blindly. Take care also with any enemy that may fire at you from the room upstairs. After you believe most of them are dead, visit the three other rooms (the one ahead of you and two upstairs) and make sure all the enemies are dead. Take care with a closet at the room above of you because most likely an enemy will get out of there.
S46 - From K6, the exit back door of city hall, kill the enemy near the Tiger Tank.
As a curiosity, fire a bazooka round at the Tiger Tank, from K46 and watch it beautifully swing.
And another curiosity: sometimes you can find an enemy located atop the city hall tower but, due to a bug in his position - he's too low - he never sees you and hence he is never triggered to react and to shoot at you. Too bad because it'd be cool to kill someone up there.
| Now, all you have to do is to climb down the stairs at K46 and head near the Tiger Tank. The crew will follow you and the level will end. If you have any problem trying to gather the tank crew near the Tiger Tank, try getting out of there, back to the street, outside city hall, and, after all your squad is also outside, take the way back to the city hall, with all your squad making a line behind you. When near the Tiger Tank, walk to its left side until you cannot go any further. |
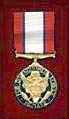 If you, despite heavy enemy sniper activity, safeguarded the passage of all three members of a special tank crew through the streets of Landenau, near Brest, then, for this exceptionally meritorious service to the government in a duty of great responsibility, you're awarded the Distinguished Service Medal. Your squad are very grateful and you also should thank them for helping you out (pic. 7).
If more men from your squad, besides the full tank crew, are also kept alive till the end (I'm not sure if just one is enough), you'll be awarded with the Bazooka-Med bonus level.
Main Picture - Click the picture to access the Enemy Spots & Killing Locations Map for City Hall.
Please, be patient because it's a very large picture with around 315kb size, so take your time. |
If you prefer a smaller working map (~ 110 kb), click here.
Obs.: Except for the Main Picture, there are no other cheated screenshots illustrating this text, only real ones.
http://www.viol.net/mohaa
Version 1.00 posted on Mar 11th, 2002.
(v.1.03 - Mar 22nd, 2002)
All rights reserved. © 2002 by André Viol.