 |
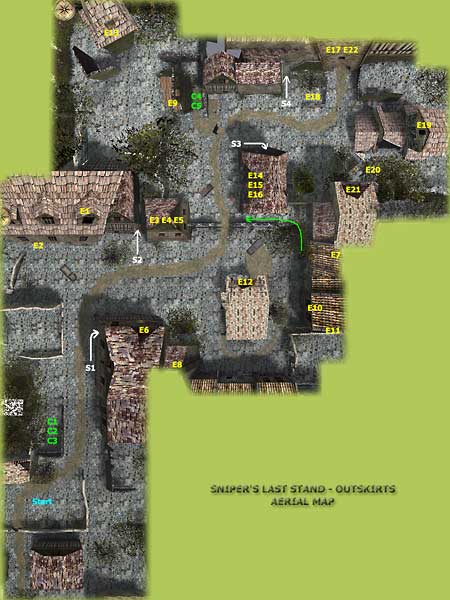
| Main Picture - Aerial view map with all the possible positions where there may be enemies and the spots where the bazooka team can be located. Click it for a bigger map. |
Sniper's Last Stand - Outskirts - MoHAA
Where Are Those Merciless Snipers & The Bazooka Team?
You're at mission five, the "Day of the Tiger", at its very first level: Sniper's Last Stand, hard difficulty setting.
It's comprised of two parts. The first one is called Outskirts and the second is the City Hall.
Only the first one is covered on this page. If you want a walkthrough with lots of tips and hints for the second one, go to the City Hall page.
Outskirts has three objectives:
The most difficult one is the first because to locate the bazooka team, you'll have to get to know the whole town, know as Sniper Town, and getting to know it means having to kill a lot of hidden and dangerous enemy snipers. So, these three objectives could be summed up as just one: Kill The Snipers On Your Way !!
I'm not going to detail all the steps you should go through to kill the snipers. Instead, I'm going to give some very useful tips about the level and about the bazooka team and I'm sure it will make it easier for you to beat those pesky snipers. If you want a step by step walkthrough, take a look at the last topic of this page.
|
The Enemy Position Map |
Maybe the first and most wanted tip is the location of every sniper in town. You can know their initial position by looking at the Main Picture, at the end of this page. All the possible spots are marked with a yellow tag starting with an "E" followed by a number. As you can see, there can be a maximum of 22 snipers in town. But, some important additional considerations apply:
Even in the hard difficulty setting, you should not find all the twenty two snipers. It seems that it's random if they'll be present or not. So, although their positions are fixed, an enemy of a given position may or may not be present, by the time you do the level. So, you're not going to face 22 enemies, but less than this amount.
Note: The reader Bruce L. warned me about the 22th enemy (E7, on the map), that I had overlooked. He also informed that "the script for this level kills off 1 sniper (for randomness) when it spawns the level when difficulty is on hard. Otherwise it kills off 4 snipers for the other difficulty levels". That's a very interesting piece of information (Thanks B.L. !!).
Besides those fixed positioned enemies, you can face enemies hidden inside the closets that you can find inside some rooms (specially E3-E4-E5 - spot "1" - or E6 - spot "2" - rooms). When you enter a room with a bright texturized closet, while inside that room, watch out because, all of a sudden, an enemy can get out of there, opening its doors, and firing at you (pic. 1). When this happens, you'll hear the loud noise of the closet's doors opening. You cannot be sure if an enemy will rush out of the closet or not because this event is also random. So, the tip is: stay alert and keep looking at the closet, whenever possible, when inside a room with one of them.
The numbers following the "E", on the enemy spot tags, are related to a suggestion of order of killing, although you may find easier to kill them in many different orders; these numbers are also used as an easy way of identifying the enemies.
To make it even easier to find the snipers, here's a brief description of their positions:
- E1 - at the window on the 2nd floor of the house;
- E2 - under the archways, behind the car, floor level;
- E3, E4, E5 - inside the house, one at each window; they can eventually get outside through the stairs;
- E6 - inside the house, shooting through the opening in the wall;
- E7 - on the rooftop;
- E8 - on the rooftop, at the right of a chimney;
- E9 - 1st floor of the badly ruined house;
- E10 - inside the house, shooting through a window, floor level;
- E11 - in a very narrow alley, floor level;
- E12 - 1st floor of the ruined house, through a hole or a window;
- E13 - at the top of the high tower, inside it;
- E14, E15, E16 - inside the house (grenades thrown through the hole can kill some of them);
- E17, E22 - inside the house; can shoot at you from the window or the door;
- E18 - floor level, near a brick wall corner;
- E19 - at the top of the high tower, inside it;
- E20 - floor level, behind some debris, near a tree;
- E21 - 1st floor of the ruined house, through a hole or a window.
|
Killing The Snipers |
How to kill the snipers? The first one (E1) can and must be killed before meeting your comrades (C1, C2 and C3). As soon as the level starts, just strafe carefully to the right, until the the first enemy can be seen through your scope. Then, snipe him. If you waste time gathering with your comrades before killing E1, some shots, from E1, will be already hitting them and you.
To kill all the other enemy snipers, my tips are:
"Move carefully and take your time", as Colonel Hargrove tells you in the mission briefing. The enemy snipers are really skilled (too much for realism, indeed) and very agile (ditto): they don't waste a fraction of a second when you get in their sight. You already know their locations, so choose the best corner, the best hidden place to shoot them, to surprise them. Remember that if they can hit you from a distance, so can you.
Even taking extreme care, you'll be shot a lot of times, even knowing where they are. So, save often, it's the best insurance against getting killed for good.
Try to keep your fellows alive. Although this is a tough task, because those fellows seem to be sort of stupid (they love to open fire at the enemies in an open field, without taking cover), if you keep them alive, they can help you, not by killing the enemies for you, but by warning you about them. Whenever you're about to be shot, if some of your fellows are alive, they will shout at you, with warning messages, like "Fire!", "Over there!", "Open fire!", "Look out!", "Watch it!", "Shoot!", "Attack!", or similar. These alerts really help, because you know you're about to be (or already is) on a clear path for the enemy to shoot at you (and for you to shoot at him!). So, for instance, if you're in a corner, crouched, with the scope on, strafing carefully to one side, trying to find an enemy, pay attention to your fellows' shouts; when they shout, if you are not seeing the enemy yet, strafe back and start the search by strafing again (pic. 2). But, although this is a common reaction of your fellows, there may have some times that you're not going to be previously warned at all, or, many times when they shout but it's too late. Note yet that some very hard to find enemies are sometimes killed by your fellows sort of easily: it seems that the same artificial intelligence used for the enemies are also used for your fellows: the ability to quickly see an opponent, as soon as he is on sight, and shoot at him almost immediately.
Keep an eye on your compass for the direction from where you were hit. Strafe out of the line of fire and, when back to resume searching, look carefully in that direction because now you already know that the enemy's pretty much directly in front of you. This great tip, taken from EA forum, reminded me to talk about the useful but almost always neglected compass.
At the middle of your way to the gate, you will find two additional fellows (C4 and C5), but it's not an easy task to protect them from the enemy fire. They are killed very easily at that location, with just one shot each, so it seems (remember that I'm talking about the hard difficulty mode). The only way that I found to keep them alive is this:
After you kill enemies E1 to E13, most likely you're near a tree, near the house where E12 were located. Quicksave, crouch (if you're not yet), walk very slowly, and take the path shown by the green arrow, on the map.
Walk hugged to the wall, to your left, and stop when you're near the corner of the house, able to see the location where C4 and C5 are crouched (pic. 3). Doing so, chances are that there'll be no enemy reactions (while going to this location, you should not hear any german shouting). Note that all your three fellows should be still on the other side of the wall.
Wait and very soon a fellow will cross the wall, through its broken part, he'll come near you and will hear a sort of a code, from C4-C5: "Thunder!". He'll answer it: "Flash!". Then, C1, C2 and C3 will head to that location to gather C4 and C5. After a while, all of them should get out of there, to a safer position, behind you.
You'll hear them say: "Hey Hill, look it's Parish". "Finn. Hill. I figured you guys were dead". "Not yet".
These events won't happen the same way all the times. Sometimes the enemies will fire at your fellows and kill some of them. Sometimes, the enemies won't fire a single shot. If the former happens, quickload and start this sequence again. Whatever happens, while the five fellows are not safe, behind you, do not fire, stand quiet (pic. 3).
After they are safe, you can resume killing by going near the opening of the nearby house and throwing some grenades in there, to kill the Germans inside or, at least, to make them move and get clearance. One of them, the one near the bed, can be killed easily.
|
The Bazooka Team |
It's common someone get lost trying to find the bazooka team. So, my info & tips about it are:
The bazooka team is indeed DEAD. When you find them, they'll be already dead. There is nothing you can do to save their lives, Lieutenant. So, you're not going to find the bazooka team but actually only the bazooka and two additional heavy rounds (and the corpses).
And where is the bazooka team? There are four possible locations where you can find the bazooka team and they are the four rooms, in town, that you can really get inside. They are:
- the E6 room, or Spot 1 = S1 on the map, a.k.a. Rain in the eyes, as the automatically saved game title;
- the E3-E4-E5 room, or Spot 2 = S2 on the map, a.k.a. Downpour (saved game);
- the E14-E15-E16 room, or Spot 3 = S3 on the map, a.k.a. Scope soaked; or
- the E17-E22 room, or Spot 4 = S4 on the map, a.k.a. Muddy depths.
But in which room the bazooka team really is? Here's an interesting idea the designers of the level had. The bazooka team will be located in the LAST room that you look for it (pic. 4). Normally, since this is a very linear game, you will first enter the E6 room, than the E3-E4-E5 room, then the E14-E15-E16 room and finally the E17-E22 room, so most of the players do find the bazooka team at the spot 4. But the truth is that if you do not enter, for instance, the spot 1, for any reason, than you enter the other three locations, you will not find the bazooka team until you come back to the spot 1 (E6 room), where it'll be.
I found it very interesting because if some player forgets to enter just one of the four rooms available to get inside, he'll have difficulty in finding the bazooka team because this'll be the room where the bazooka team will be. That's why so many players keep asking, in the forums, where are the bazooka team. Great idea, 2015 !! Note that, consistently, until you do find the bazooka team, the compass doesn't help you: it keeps showing that you are always near the objective.
After you have found the bazooka team, you have to pass the gate. If the gate isn't already open, if you try to open it, you'll receive a message: "Find a way through the gate". You have two options: fire a bazooka shot at the gate to blast it open or wait around thirty seconds and three new enemies will show up, from the other side of the gate, to open it (and try to kill you!). So, the first solution brings no additional enemies while the latter, adds three more enemies for you to easily kill them with the Thompson, for instance, and save a heavy round. I prefer the latter. After the gate is open, all the fellows that survived this first part, will proceed to the other side of the gate and they will keep helping you on the next level.
Note: I have read some messages about some players that never find the bazooka team. They look into the four rooms and the bazooka team is nowhere. They do find some rounds, but not the bazooka. Without the bazooka, they can't go on, since the objective is never completed and, so, the level gets endless. My opinion about this situation is that it is a bug. My advice is to restart the level but not from any saved game from the level itself, even the first one, the automatic one (marked with a 'Starting' tag). Restart it from the last saved game you have from the previous level (well, from the beginning of the mission briefing, since this level is the first one of mission 5), so you'll get a real fresh and hopefully unbugged start of Outskirts.
|
Step by Step Walkthrough |
If you feel that even after getting to know my tips and hints you want or need a good step by step walkthrough for this part of the level, you can find one here, written by Stevie Buist, from the Medal of Honor Allied Assault H.Q. site.
After you're finished with Outskirts, it's time to face the City Hall sequence. I think you've had a good experience with the snipers already and you're better prepared to face more of them now.
|
| Main Picture - Aerial view map with all the possible positions where there may be enemies and the spots where the bazooka team can be located. Click it for a bigger map. |
Obs.: Except for the Main Picture, there are no other cheated screenshots illustrating this text, only real ones.
|
Hope It Helped !! |
http://www.viol.net/mohaa
Version 1.00 posted on March, 6th, 2002
(V.1.05 - Apr 26th, 2002)
All rights reserved. © 2002 by André Viol.