The Communications Blackout - MoHAA

Lower Town

Introduction

    You're at mission six, "The Return To Schmerzen", third sub-mission: The Communications Blackout.  Hard difficulty setting.

    This walkthrough is divided into two parts (see below).  Click the one you want to read but consider that the second part only applies as a sequel of the preceding one since they are interconnected:


    You have just finished the three parts Siegfried Line levels and you must be, by now, tired of trees, stones and snow (the last part, Die Sturmgewehr, is not in the forest itself, but the fortification is still inside the forest) and now you're reaching a heavily guarded town.  You'll have two objectives:

    The second objective is not shown in your list until you complete the first one.

    This sub-mission has some similarities with The Command Post, from Mission 4.  You'll be going through a very stealthy part, initially, and then, you'll be forced to a run & gun situation.  In the first part, while stealthy, my advice is to kill all the enemies on the map, so you'll have to face less of them, while running & gunning.  There are alarms and alarm switches all over the town and under any sign of your presence the enemy will turn it on.  Many, but not all, of the characteristics of the spawned enemies mentioned in the topic "Spawned Enemies & Alarm-Oriented Behaviour", from The Command Post walkthrough, applies also to this level.  A worth mentioning difference is that the spawned enemies do not use machine guns, but rifles instead, so, the "Let it Ring" technique is not advisable since you cannot keep killing them using the slow rifle and, if you use the machine gun, you may run out of ammo.  Luckily, you won't need to use this technique at all, as you'll see, because, if everything goes as planned, during the whole stealthy part, you won't let the enemies turn the alarm on even once.  Also, I've found that many times the enemies do not head to the nearest alarm switch, when they notice your presence; they head to a very distant one.  Go figure!

    Once again, to make it easier for me to reference key points of the town, I've provided a map for the level.  Take a look at the Main Picture, at the end of this walkthrough (you must click it to access the full map).  It shows a complete aerial view of the level.  The montage of this map was specially difficult because there are too many houses in the city, one near the other, what makes merging the screenshots a tough task, so it's far from perfect.  Whenever you see a symbol between a pair of brackets in this text, search for it in the map to know what I'm talking about.  Yellow "E" tags are used to mark the enemy original locations; white "K" tags, for showing the spots from where you're going to kill the enemies and blue tags for other purposes.  Some "K" tags are missing because many times you kill more than one enemy from the same location.  "E" tags shown on the map over the roof of a building means that the related enemy is actually inside that building.  All the houses that you can actually enter are marked with a blue "H" sequential tag.  Finally, some greenish tags are used for the spawned enemies, at the last phase of this walkthrough..

    For the sake of dividing this walkthrough into topics, I'll be calling the first part of it as the Lower Town part.  It corresponds to killing the enemies from the part of the town before you have to climb up the staircase in midtown (ST, on the map).  The stealthy part beyond this staircase will be called Upper Town.  The run & gun part also takes place at the so-called Upper Town.  The map thumbnail, at the end of this page, clarifies the division.


  Stealthily Killing − The Sequel − Lower Town  


    You start the level near the entrance of the town.  Select the silenced hi-standard pistol and quickload.  Unless noted otherwise, DO NOT run, always WALK.

1.Pic. 1 - The first two enemies can be killed without they even noticing who the heck killed them.

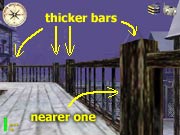
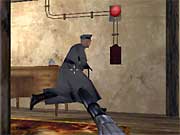
    Two enemies guard the entrance (E1 and E2).  Kill both before one of them turn the alarm on.  The easiest way to do it is to head towards their direction immediately after the level starts.  When you get near the entrance, both enemies will be patrolling the area but they cannot see you for some moments, since they are not looking towards your direction (pic. 1).  Get close to the first and nearer one (to the left, at pic. 1) and just pistol whip him once or twice (K1).  DO NOT kill him or the other enemy will immediately shoot at you, making noise and hitting you.  Then, shoot the second enemy, one shot, head shot, no mercy.  Now, just pistol whip again the agonizing enemy near you and finish him off.  Now visit the guard house, there is a grenade box inside.  Funny thing: why grenades if this is supposed to be a stealthy mission?  Grab them!

  
2.Pic. 2 - Shoot the enemy in the leg and then kill the guy inside the room.

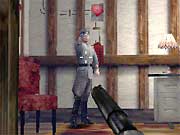
    Next, enter the town.  Walking!  Reload.  At the first corner to the left, you'll see an enemy (E3).  Do not approach him or another enemy inside the house at the right side of the street (E4) will see you through the window.  Stay very near the door to this room (K3).  Crouch, just to make you're a smaller target.  Now, you're going to use the same technique used to kill the first two enemies.  Injure one enemy, kill the second one and finish off the first one.  That's the trick.  To injure the guy at the corner, shoot him in the leg (without killing him!).

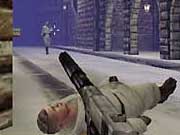
    While he's agonizing and cursing, open the door and quickly kill the dark-coated German inside, that will try to turn the alarm on (pic. 2).  Don't let him do it.  Then, turn back and another shot must be enough to finish killing the guy at the corner.  Four enemies killed.

    Note: If you lose the right timing to kill the first enemy (E1), you can use the same technique: instead of pistol whipping him, shoot his leg, while you kill the second enemy (E2).  Also, while at K3, if you hear sounds of a door being opened and closed many times, don't worry, it's an enemy, inside a nearby house, curious about what's going on.  Rarely, he'll get out of the house and head to the corner where E3 was.  If this happen, just kill him from K3.

  
3.Pic. 3 - E5 is easy to kill.  Just avoid him to see you and run to an alarm switch.

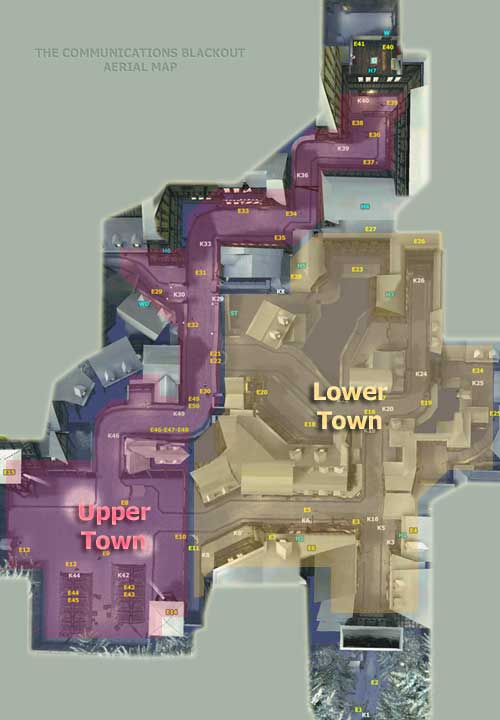
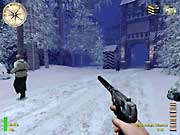
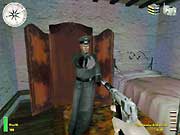
    Now stay put.  Quicksave and reload.  Move a little ahead so you can have a better view of the street to the left (K5).  There is an enemy patrolling that street (E5).  If you're at the right timing, this guy won't have seen you killing E3.  He'll soon be coming towards your direction and he'll see you (pic. 3).  You must kill him before he sees you, or he'll run to an alarm switch.  Using the scope, you can see him (if not immediately, after a while).  But do not use it, its noise is fatal.  Select back the pistol.  Once you have a good view, kill him.  Now enter the house where you killed the dark-coated German and grab a 24 pistol rounds box; there is also health inside.

  
4.

    Go ahead in that street, until you see a door at the left.  Beside this door, there is a window.  Face the door and, using strafe right, strafe to the window (K6).  You should see an enemy inside that room, he'll open the door and when he sees you, he'll try to shoot at you through the window.  You can kill him right there, from outside (pic. 4).  The window won't protect him (or you).  You can hide yourself outside, near the door, and just wait him to get out of the room and, outside, kill him easily.  But I prefer killing him as soon as he opens the door, from outside, so no time is wasted and another enemy, upstairs, will have no time to turn on the alarm.  Note that this is the enemy mentioned in the Note of step 1.

  
5.Pic. 5 - Door open equals 'be quick' but door closed means almost always a very easy situation.

    Enter this house.  Pass through the door the last guy came from, take the right, go ahead in that corridor and climb up the stairs.  Do all this running, not walking.  As soon as you get upstairs, or while getting upstairs, look to your right. There is a door, that leads to a balcony outside.  You can find an enemy (E7) coming in from that door and running to an alarm switch in the room to your left, or shooting at you, or you can find the door closed.  You must manage to get upstairs before this enemy can set the alarm on, in case he gets out of the balcony (i.e., if you find the door open), and kill him.  If the door is closed, it's a much easier situation.  Just open the door and wait (pic.5). The enemy is patrolling the balcony and he cannot see you (he's sort of blind, in this situation!).  Just wait him to get close and kill him with the pistol.  Sometimes, when you open the door, he'll notice you, so be careful and stay crouched, when opening the door.  And don't forget to grab his ammunition for your pistol.

Pic. 5a - Take care with this closet.  Shoot its door before entering the room to kill eventual enemy inside!    Note: two readers, James H. and Robert B., informed me that I overlooked one enemy inside this house.  Here's what James wrote: "I think you've missed an enemy on this sub-mission. He's hiding in the closet of the left-hand room on the hallway of the house with the balcony (though like the Sniper's Last Stand level this could be random). Also I don't know if this is because I'm playing on easy but you seem to be able to kill people in closets by shooting them before they come out".  Here's what Robert told me: "I have definitely encountered enemy jumping out of a closet other than the commandant's residence ... I am playing the difficult level...".  After they alerted me, I replayed the mission and confirmed that there may be one enemy inside the closet, at the room beside the one with the piano and the viola inside, and it happens randomly.  Also, I confirmed that shooting the closet, just in case, is enough to kill the bastard inside.  It works fine on hard mode.  This is a very good tip and it may come in handy for other past levels.  Too bad I got to know it only now...

6.

    This is a long step.  Go to the balcony, outside, always walking.  You have killed seven enemies so far.  From the balcony (K8), you should be able to kill eight more of them.  In pic. 6, you can see six out of the eight.  The other two are the guards at the two watch towers.  You will kill the guys at the towers last and the guys at the floor first.  Now, it's an exercise of patience.  It's easy to kill them all, you just have to do it at the right moment.  You can follow the killing order shown in pic. 6 or make your own.

  • First, kill enemy "1", the guy at the right guard house.  Kill him first so he doesn't stand a chance to turn the alarm on.  Wait until enemies "2" and "3" are away from not able to see enemy "1".  Use the pistol and you can stand up.

  • Then, enemy "2", the guy patrolling the two buildings of the Command Post, walking around them clockwise.  Wait until he's out of sight of and away from enemy "3" and kill him. Use the pistol and you can be stood up.

  • Next, enemies "3" and "4", at the stationary machine gun, below you.  First, the one stood up, then the one at the MG.  Use the pistol and be crouched.

  • Then, enemy "5", the guy patrolling the buildings, walking around the one to the right, counterclockwise.  Just wait until he's on sight and shoot him.  You can use the rifle and be stood up.

  • Next, enemy "6", the guy at the far back guard house.  Use the rifle and be stood up.

  • Now, crouch, position yourself in a way that you can see the enemy at the left watch tower but the one at the far right tower cannot see and hit you (slightly to the left and behind K8).  Protect yourself behind a thick bar of the balcony railing.  Then, shoot the guy at the left tower (enemy "7").  You can use the rifle.  The other guy, at the right tower, will aim its light at you but since he cannot see you or hit you, soon he'll give up.  As soon as the light is gone, stand up and, using the rifle, kill him (enemy "8").  The outside area of the command post is clean.

    Note 1: Sometimes, it seems that the sensibility of some enemies are just too high, above average, and this characteristic is sort of random.  It may be in one enemy one time and in another different enemy, another time, as you replay the sub-mission.  Although I'm just guessing here, this feeling of a special behaviour factor to random enemies I had also when playing over and over the "The Command Post" sub-mission.  If this is true, than it's an interesting and smart idea of the designers of the levels, since it allows you to replay the sub-mission and go through some different situations.

Pic. 7 - If sensibility around is high, you need to get first to the nearer thicker bar of the railing, walking slowly and hugging its right side.

    I'm talking about it because, when entering the balcony, it may not be so easy to get to K8 position without being seen by the enemies.  If you are having difficulty, then you must change a little the approach.  You must be extremely careful and walk crouched and very slowly.  Note that the railing of the balcony has four thicker bars and a lot of thinner ones (pic. 7).  As soon as you enter the balcony, crouch and select the rifle, because you need its scope.  Then, go to the right side of the balcony and head to the first and nearer thicker bar of the railing, and keep looking, through the scope, at enemy E8, the one near the alarm switch and the most dangerous one.  He must obviously stay put.  If he notices you, he'll turn the alarm on.  When you're very near the first thicker bar (hugged to it), you can see E8 to the right and E9 and E12 to the left.  This spot is marked as K8' on the map (pic. 8).  Take care with E9 and E12 because they can also be sensible and notice you.  While approaching the first thicker bar, keep looking also towards E9 and E12 spots, as shown in the map, and avoid them to see you.

    Once at K8', still using the scope, pay attention to E9 and E12.  Remember that they are walking in circles around the buildings, E9 clockwise, E12 counterclockwise.  Wait until they are out of sight of E8, and, using the pistol, kill E8.  Then, wait until E9 is again beside the nearer building, way out of sight of E12, and kill him.   Then, do the rest: E10, E11, E12 and so on.  If the sensible enemies are not E8, E9 and E12, then you'll must find a way to kill them all, without having the alarm turned on.

    Note 2: Before killing the two guards at the watch towers, if you stay up and hugged to the railing, you can choose anyone of them, kill him, and the other will start shooting at you.  But the bullets won't reach you !!  The bullets hit the railing.  If you crouch, at the same very position (hugged the railing) or if you walk back just a little, the bullets start injuring you.  Weird bug.

    Note 3: Enemies from 1 to 8, in pic. 6, correspond to enemies from E8 to E15 on the map, respectively.

  
7.

    Now, get to know the house you're in.  Grab a 24 pistol rounds box on a table, at the room with the alarm switch.  You may need it.  Downstairs, you can find health and grenades (more grenades?).  You can even play the piano and the viola: just stay next to them, face them and use them (pic. 9).  Use each one twice, to hear the full melody.  Get out of the house and pay a visit to the stationary machine gun, in case you need more health.  You cannot proceed to the radio command post, through this street.  You must go back.

  
8.

    Head back to the entrance street and stop at the corner (K16).  Select the Springfield rifle and, using the scope, take a look ahead of you, in the direction of the street, and you'll soon see and enemy at the end of it (E16 - pic. 10).  E16 is patrolling the area near that corner.  His path is short so he gets in and out of sight constantly.  Kill him.  There is another enemy patrolling the area, E17, walking in circle around the block at the end of the street, counterclockwise.  Wait until he passes in front of you and then shoot him.  If you kill E16 when E17 is near, or vice versa, you'll just have to be quick because the other enemy is going to start shooting at you immediately, so you'd better wait until each one of them is isolated from the other.  Sometimes, after killing E16 or E17, E18 gets out of his original position and head to the same corner.  Just kill him from the same location you are (K16).

    If he doesn't show up, then, select your pistol and head towards that corner.  When you approach it, E18 will invariably show up, then it's time to kill him.  Do not walk further than what's necessary to trigger E18 or the enemy at the balcony to the right (E19) will shoot at you.

  
9.

    Now, it's time to kill the balcony guys.  Go to the left side of the entrance street (K19) and, using the pistol, quickly strafe left, until you see the enemy at the balcony (E19), and shoot him.  Watch his nice falling.  Now, go straight to the right side of the entrance street and then walk to the middle of the next street (K20).  From this position, the enemy at the far balcony (E20) cannot see you yet.  So, just use the rifle and the scope and kill him (pic. 11).  Don't miss his falling from that high balcony.

  
10.

    Still with the rifle selected, walk ahead and stop at K21.  From this position, using the scope, you can kill the two guys at the stationary machine gun (E21 and E22), at the end of the street, under the archway (pic. 12), and another enemy, at you right, far away, at the other side of the lake (E23).  Kill first the guy stood up, at the stationary MG, then the one operating the MG.  Then, turn right and kill E23; he's not so easy to be seen, even using the scope, due to the fog and the distance, but paying close attention you can kill him.  If you have any trouble, don't worry (and don't alert him!!), you can kill E23 later.  None of these enemies can see you from K21.

  
11.

    Head back towards K24, near an arched entrance to a small secondary area.  Before entering this area, kill E24, now using the pistol again.  Enter the area and pay attention to a small bridge above you, connecting two houses.  There is an enemy patrolling that bridge (E25), so wait him to show up and kill him.  Don't let him see you first.

    Curiosity: Make E24 see you quickly and don't shoot him (hide from him).  Most probably he won't look for you also and he'll head towards an alarm switch.  Follow him.  When he's about to turn the alarm on, kill him.  It's funny to be sadist sometimes.  This is a rather common behaviour of the black-coated enemies (and some others).  They are more worried about setting the alarm on than killing you.  I enjoy following them.

  
12.

    Get out of this area and go back to K24 position.  Walk ahead this street until you reach the end of it (K26).  Open the door but pay attention because there is an enemy inside, ready to fire at you.  Shoot him first and kill him.  Enter inside this house, grab the 24 pistol rounds box on the table, go ahead and take left to climb up some stairs.  Turn right, at the end of the stairs and keep going ahead until the end of the corridor.  Then, open the door and, again, pay attention because another enemy is inside and ready to fire at you.  Kill him first and, if you still need, there are grenades inside this room.  Visit the house, if you want, but there is nothing else to grab.  Go back downstairs and get out of the house by the other door, not the one you used to enter it.  If you didn't kill E23 before, open the exit door carefully and kill him now.

    Note: On the way to this house, before reaching K26, you can enter another house at the left side of the street (H3), where you can find more health, more grenades and three 96 Mg rounds boxes.  Also, if you want, drink some wine, but be warned that your aiming ability will be jeopardised  :-)  (just kidding).

  
13.Pic. 13 - This dark-coated German, against all known common behaviour, wants to kill you, instead of trying to toggle the alarm on!

    After getting out of the house (H4), by its secondary door, follow the path and soon you'll see a door to your right, to access the next house (H5).  Open the door and be careful.  There is one enemy inside (E28) but, to deny the logic, he seems to be more worried about shooting at you then about toggling the alarm on, although the alarm switch is so near him (pic. 13).  Don't forget to grab his ammo, since he's using a pistol.  Inside, you can find Smg rounds and health.  Lower Town is clean, but not completely safe.


  Upper Town − The Grenade Domain   


    Click here to go to the next and last page of this walkthrough.


  The Map Of The Town  


Main Picture - The city map showing all the enemy positions, including the spawned ones, and the best spots to kill them from.  Click the image to open a bigger working picture (224 kb).

    If you prefer a smaller working map (~ 74 kb), click here

Obs.: The town's map is based entirely on cheated screenshots.  All others are real screenshots or cut from real ones.


  Hope It Helped !!  


http://www.viol.net/mohaa
Version 1.00 posted on Apr 21st, 2002.
(V.1.01 - May, 26)

All rights reserved. © 2002 by André Viol.