The Communications Blackout - MoHAA
Upper Town
Introduction
You're at mission six, "The Return To Schmerzen", third sub-mission: The Communications Blackout. Hard difficulty setting.
This walkthrough is divided into two parts (see below). Click the one you want to read but consider that the second part only applies as a sequel of the preceding one since they are interconnected:
- Part I - Killing the enemies in Lower Town.
- Part II - Killing the enemies in Upper Town (this page).
If you want to access the aerial view map of The Communications Blackout, please, go back to Part I and click the Main Picture, at the bottom of the page, or choose the small version of it using the appropriate link.
If you want to know about the escape to the Commandant's house, see the Topics "Run & Gun All The Way But..." and "... There Is A Big Trick", down below.
|
Upper Town − The Grenade Domain |
|
Now it's time to face the midtown main stairs (ST), the stairs that connect Lower Town and Upper Town, as I'm calling these two sectors of the city. What's special about the stairs? The fact that you cannot always predict what is going to happen next. Before facing the stairs, though, I want to mention a reader, Robert B., that sent me a lot of tips and showed me an easier way to deal with these stairs, that I was overlooking. A big thanks to you, for all your messages, Robert!
Why you can't predict? Again, in my opinion, it's the random behaviour factor of some enemies, the same mentioned in Note 1 of step 6, in Part I. Up the stairs, there is one enemy (E29) whose main purpose is to toggle the alarm on, and the alarm switch is just a door away from him, inside a near house (H6). Three other Germans (E30, E31 and E32) guard the area, patrolling the whole extension of the street, walking from one extremity to the other, on and on.
You have the stairs to climb up and four enemies to beat before E29 can turn the alarm on. What to do? Actually, if you don't mind having the alarm toggled on, just run up the stairs and then face the spawned enemies. It's not very tough a situation. Just run up the stairs and head directly towards E29 location, i.e, straight ahead. By the time you've crossed the street, he'll probably be already inside the house. So, turn right and enter the house (H6). Kill the German inside (E29), that set the alarm on, turn it off, wait the two spawned enemies to show up, kill them, and that's it.
But I always look for the stealthiest way, which means not allowing the alarm to go on. According to my observations, there may be three possible situations that can happen when trying to avoid the alarm:
- Easy: You may be able to to climb up the staircase and the four enemies up there won't notice you;
- Medium: You may find a situation where you climb up the staircase but they'll notice you before you can get upstairs and they'll start throwing grenades down;
- Hard: You may find it impossible to climb up the staircase without the smart guy (E29) setting the alarm on, before you can reach upstairs.
Each one of these three situations requires a different solution. My advice is: quicksave, try the easy one; if it's not possible, quickload and try the medium one; again, if it's not possible, then you must go for the hard one. So, let's do it.
| 14. |
Get out of the house you're still in (H5), using its other door (the door you didn't use to enter it). Take care to avoid being spotted by one of the enemies up the bridge; E30 can eventually see you. If you have any difficult, get out of H5 crouched. Now, do not step on the snowy floor yet, keep yourself outside the house but under its roof, on the sidewalk where there is no snow (KX, on the map). If you step on the snowy floor, you may end up making noise and you may be detected. Reload the pistol and quicksave. |
| | |
| a. |
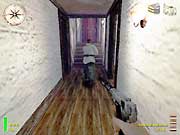
You're going to try the easy approach first. From KX, start walking towards the staircase (get up, if needed), slowly, and climb it up, but now crouched, always walking carefully. Once near K29, use the wall as cover, strafe right and quickly kill E29 using the pistol. If everything goes as the easy situation is supposed to go, E29 will be in his original position, not aware of your presence, until you strafe to kill him, when it's too late for him to react. The other enemies (E30-E31-E32) may be around, but they won't notice you either. If necessary, before killing E29, wait until they are out of sight (pic. 14). You must kill E29 first because he's the smartest guy, the one that toggles the alarm on. Once E29 is dead, killing the others is easy. You may use the rifle, a machine gun, grenades or the pistol and you may stay at K29 or run to K30 (see step 15). |
| | |
| b. |
Didn't it work? No problem. But before trying the medium approach, try once or twice again the easy one. If you still can't make it work, it's time for an upgrade! Quickload your last saved game. From Kx, start running towards the staircase (get up, if needed), climb it up and, no time wasted, just kill E29 when you reach K29 before he can react or run towards the alarm. Then, again, killing the other Germans is not a big problem because they don't run to the alarm and they stay in the nearby area. Just be careful with the grenades they'll keep throwing at you (see step 15). |
Still can't make it? The smart guy reaches the alarm before you can reach him? Well, try again, once or twice, to be sure there is no other way than going for the hard solution: the use of grenades before running up! And here comes the grenade domain. By using a grenade, you can avoid the alarm, definitely. I advice you that whenever you need to use grenades in this level, use the Stielhandgranate kind, the German grenades, because you can replace the ones you used, since there are plenty of them around town. If you use the Frag grenade, there'll be no replacement for them.
| c. |
From KX, necessarily crouched, select the rifle and set the scope on. Aim the bridge, as shown in pic. 15, and pay attention to the moment when E30 becomes momentary visible. You're going to throw a grenade up there but you must throw it when E30 is at the left of you. When you see E30, if he's patrolling from left to right, then you'll have to wait until he comes back. Note that, if you're not crouched, this is when E30 can see you. Don't let it happen (that's why you must be crouched). If he's passing from right to left, then it's time to act. |
| | |
| |
As soon as you see him going from right to left, stand up and select the grenade. Stay near the edge of the sidewalk and aim exactly the center of a specific window, as shown in picture 16 (look for WD, on the map). Quicksave! Now just click the Fire button to throw the grenade. DO NOT hold the Fire button or you'll apply more strength to the launch then what is needed. Immediately after the grenade is thrown up, start running towards the stairs and climb it up. While running change weapon to the silenced pistol. When you get upstairs, you may find the alarm-oriented-minded E29 enemy in some different positions. Most of the times, he'll be still running towards the house (H6) to turn the alarm on, but you will have enough time to kill him, from where the stairs end (K29), shooting at his back. Sometimes, if you're really quick in your movements, you will find him still crouched, in the middle of the street, somewhere near you, protecting himself against the grenade you have just thrown up. And sometimes, when you lose some precious time in your way up, he'll be already out of sight, inside the house and about to toggle the alarm on. When this happens, you have to start it over, so quickload. Anyway, your goal is to kill E29 before he can get to the alarm. Keep trying until you manage it. |
| | |
| 15. |
After you have killed E29, run straight ahead, until you cross the street and get to the other side (K30). Normally, you will cross the street and won't be hit by the other enemies. As soon as you get to K30, crouch. Now, there are three enemies to kill on the street and depending on which solution you used to kill E29 and where the enemies were when you threw the grenade (solution "c"), two of them (E31-E32) can be to your right or to the left. You can know if there is any of them to your left just by listening to their shouts (I use a headphone so it's very easy to know the direction of the sounds). To kill all of them is easy. If there is anyone to your left, you can even use the machine gun of your choice. If all of them are to the right side, you can use the rifle and, strafing carefully to the left, always at K30, kill one by one, as they show up on your scope. You must take care with the grenades they throw at you. It's not easy to hit you at K30 but now and then a grenade can harm you pretty badly. After killing them all, enter the house (H6), if you need a little health. |
| | |
| 16. |
Now, get out the house and go back to the street. Take left and head to the next corner (K33). Do not walk too much, just enough to see the first archway ahead. Select the grenade and throw it under the archway. One enemy hidden below that archway (E33) will get out of there. Kill him as soon as he shows up. Another enemy (E34) will come to see what's going on. Just wait for him in the same corner and kill him. The last enemy of this area (E35) is smarter. He usually stays put in his original position or near, so select the rifle, scope on, strafe left carefully and when he's within the aim, quickly kill him. |
| | |
| 17. |
Keep going ahead. Turn left and STOP! Your last street enemies are waiting for you. You're very near the entrance door to the Commandant's residence and there are four enemies guarding the area. |
You need to kill them all before they can run to an alarm. Of course you always have the option to not bother the alarm and deal with the situation facing the spawned guys. But, again, I always choose to avoid that annoying alarm. There are some very different ways to solve the problem:
- You can face directly the enemies. Good for the courageous players out there;
- You can do the opposite. Good for the snipelike players out there;
- You can use grenades. Good for the strategic players around.
| a. |
Facing the enemies. Reload your weapon, it can be the pistol or any machine gun, and invade the area and kill them all. Easier said then done, but possible. Sometimes, you won't avoid E38 to get to the alarm inside the house (H7). Sometimes, you'll be killed. Sometimes you'll do it. Keep trying. |
| | |
| b. |
Doing the opposite. This is a funny situation but it happens rather constantly. Positioned at K36 or nearer the corner, strafe left just enough to make enemy E36 see you and be triggered. Immediately (don't let him have time to fire at you) step back and hide below the archway where E33 where hidden. Then wait, listen and watch. At least two enemies (E36 and E37) should run towards an alarm switch (pic. 17). But, strange as it may sound, they'll look not for the alarm switch inside the nearest house (H7), but for a very distant one. Both will head to Lower Town and most probably to the alarm switch at the last and farthest room of H4 (pic. 18). I have no explanation for this behaviour. Although H4 is indeed near them, to enter H4 it's a long way. I can say that I had some fun following them and killing them at the very moment they tried to toggle the alarm on.
 So, when they pass near you (you're under the archway, remember?), heading to the alarm switch, it's a piece of cake to kill both. They won't bother your presence, normally, even if they see you. The problem is the third guy, E38, because he's smarter. Normally, he'll head to the alarm switch inside H7 but, eventually, he'll also head to H4. When the latter happens, just kill him as you killed the others and you're done. You'll know that E38 decided to run to H7 when you hear the sound of a door opening. E39 seems to be the stupidest guy: he never runs to an alarm, he just want to kill you so killing him is not a problem. So, when they pass near you (you're under the archway, remember?), heading to the alarm switch, it's a piece of cake to kill both. They won't bother your presence, normally, even if they see you. The problem is the third guy, E38, because he's smarter. Normally, he'll head to the alarm switch inside H7 but, eventually, he'll also head to H4. When the latter happens, just kill him as you killed the others and you're done. You'll know that E38 decided to run to H7 when you hear the sound of a door opening. E39 seems to be the stupidest guy: he never runs to an alarm, he just want to kill you so killing him is not a problem.
|
| | |
| c. |
Using grenades! This is the most predictable way, if you throw the grenade at the right spot, and the way I like most. Position yourself at K36, i.e, hugged to the left wall and the furthest you can go ahead so that E36 CANNOT see you yet. Look to E36 direction (you cannot see him as well) and look up. There is a small clearance between the walls and you can throw a grenade through this clearance (pic. 19) so that the grenade will make everybody get out of the area to take cover, specially E38, the smart guy. As soon as you throw the grenade, change weapon to the machine gun of your choice (the pistol can also do the job) and make your day! Still at K36 but a little to the left, kill them all as they show up. Eventually E39 won't show up so you'll have to chase him. |
| | |
| 18. |
Open the door of the house (H7) and, quickly, kill the guy inside (E40) before he can react. Enter the room but keep an eye on the wardrobe because there is always an enemy inside (E41). As soon as he gets out, kill him. If you want some fun and more grenade domain, do the following: open the door of H7 but without letting E40 to see you (stay to the right of the door, before opening it). Then, select the grenade and, from outside, throw it inside. If you throw it right, you can kill E40 and if you're quick, you can appreciate his death (pic. 20). Anyway, no matter how you throw the grenade, if it explodes inside that room, E41 will always be killed inside the wardrobe (actually, there will never be an enemy getting out of it). If you need health, there is some on the table but I advice you NOT to grab it. Save it for the future! There is plenty of health all around the town and if you need some, go take it anywhere else. Just an advice, though. You still don't know but this is the place you will have to come back, after planting the explosives at the radio command post. |
| | |
| 19. |
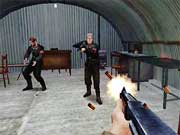 Get out of the house and head to the radio command post (RCP), on the other side of Upper Town. Don't worry because there are no more enemies on the streets. You can run at will. Select your weapon of choice. Reload. Approach the first building, at the RCP, enter and kill the two guards inside (E42-E43). If you need, there is plenty of health available and more grenades (useful to replace the ones you used). Also, take your time to listen to the beautiful and melodic ending theme music playing in the nearby phonograph. Beautiful, isn't it? But don't expect a good quality sound, remember that you're on the WWII period, CDs were not invented yet (jk). Plant two explosives inside. Get out and plant two additional explosives behind the buildings, at the base of the antennas. Now, enter the other building but be careful when opening the door because one of them will start shooting at you immediately (pic. 21). Be the better shooter. Kill both (E44-E45), enter inside, grab some health, if you need, plant the explosive to your left and face the last one, to the right. Be prepared because as soon as you plant this last explosive, a countdown will begin and stealth is gone for good. Now, do it! Get out of the house and head to the radio command post (RCP), on the other side of Upper Town. Don't worry because there are no more enemies on the streets. You can run at will. Select your weapon of choice. Reload. Approach the first building, at the RCP, enter and kill the two guards inside (E42-E43). If you need, there is plenty of health available and more grenades (useful to replace the ones you used). Also, take your time to listen to the beautiful and melodic ending theme music playing in the nearby phonograph. Beautiful, isn't it? But don't expect a good quality sound, remember that you're on the WWII period, CDs were not invented yet (jk). Plant two explosives inside. Get out and plant two additional explosives behind the buildings, at the base of the antennas. Now, enter the other building but be careful when opening the door because one of them will start shooting at you immediately (pic. 21). Be the better shooter. Kill both (E44-E45), enter inside, grab some health, if you need, plant the explosive to your left and face the last one, to the right. Be prepared because as soon as you plant this last explosive, a countdown will begin and stealth is gone for good. Now, do it! |
|
Run & Gun All The Way But... |
|
From now on it's run & gun all the way back to the Commandant's residence (H7). Although you have cleaned the city entirely, the alarm will go on anyway. Don't ask me who toggled it on.
There are at least two different approaches to beat this last part of the mission. The tough one and the easy one. You choose! But first, let's learn some interesting facts about it.
There is no use in trying to turn off the alarm. It will certainly go on again shortly after, no matter what you do. So, the first tip is: do not waste your time toggling the alarm off. Note that when you plant the explosives, an action soundtrack starts to play; for me, it's an obvious sign that stealth is gone.
From The Command Post walkthrough, you have already learned that when the alarm is on, there will always be two spawned enemies hunting you down, trying to kill you and, as soon as you kill one of them, another one is respawned instantly, to replace the killed one. What you don't know is that there is only one spot, in Upper Town, where the spawned enemies are created, i.e., there is only one spawning spot in Upper Town. This spawning spot is K39 on the map (not exactly, but very very near), so, near the Commandant's house.
As also said in The Command Post walkthrough, if you happen to be looking towards a spawning spot, or if you're very near it, the spawned enemies won't be created there, but at another spawning spot. Since in Upper Town there is only one spawning spot, if you happen to be near it, when you kill a spawned enemy, the new spawned one will be created in Lower Town, far away from you, most of times in somewhere near K26.
It's worth reminding you about the 25% health canteens the spawned enemies randomly leave near their bodies, when killed. Don't forget to grab them, if you need, while running.
The spawned enemies, in this sub-mission, wear all-white clothes. But, soon after you set the explosives, three other enemies will also be created, besides the two spawned ones. These three other enemies will be created in the street, very near the radio command post (E45, E46 and E47). The two spawned enemies will be created, as said, near the K39 location.
If you're at Lower Town, any new spawned enemy should be created also in Lower Town.
If you need a brake, while running and gunning, press the Pause key! I found this key very recently and it's a handy key. Too bad I didn't find it before so I could have talked about it in my past walkthroughs.
Now that you know some basic facts, let's get back to the steps of the walkthrough. For this last part, you can use any machine gun you like most. I prefer the pistol.
| 20. |
As soon as you plant the last explosive, start running and get out of the building. You have ten seconds before the radio command post explodes. By the time it explodes, you should be past the gate, beyond the first guard house. When you reach the first corner (K45) you have two options:
Stop and, by strafing to the left, carefully but without wasting precious time, you can kill the three enemies nearby (E45-E46-E47). They tend to move around, so be quick. One of them usually comes towards you, so just wait for him behind the corner and kill him as he shows up. Another tends to go to the other side of the street, near the light pole. And the third one tends to go to the K48 corner. Kill them all. If you're using a machine gun, spend all your clip to have an automatic reload. Eventually, one of these enemies will run away, taking the direction of the staircase (ST). He'll let you go ahead and he'll try to get you by your back! As soon as the three or two of them are dead, start running again. If there is one enemy left alive (running to the staircase), kill him now, as you turn left. If everything is going okay, quicksave. Do not stop. When you reach the corner, just strafe left quickly, as a natural continuation of your forward movement, and, as soon as you see them, you can get the three enemies still in line, one behind the other, in their original positions, as shown in the map (pic. 22). Start shooting at them immediately. It's easier, but riskier, and it saves precious time, to kill them all this way. But they won't stay in line for even a second, so you must be quick. As soon as they're dead (three of them or just two), resume the running, as in the first option above. |
| | |
| 21. |
Keep running. Reload, if necessary. Soon you'll be near the next corner (K33). On the way to this corner, you may already have to face the two first spawned enemies. It all depends on how much time you spent killing the first three enemies. If you used the quick way, you can get to this corner before the spawned enemies. Head shots to kill them. If you're using a machine gun, try to spend all your full clip, while killing these two enemies, to get an automatic reload. |
| | |
| 22. |
You're getting near the Commandant's residence, in other words, near the Upper Town spawning spot, so the new spawning enemies are not going to take long to show up. The more you're near the Commandant's residence, the quicker the new spawned enemies get to you. Keep running. You should face the new two spawned enemies when you're under the archway, near E34 position. Run under the archway and as soon as you see them, kill them, with head shots. If you're using a machine gun, now, try to be selective, while shooting because very soon there'll be more enemies. |
| | |
| 23. |
Since you're very near the spawning spot, as soon as you've killed the last two spawned enemies, new ones should almost immediately show up. By now, you must be very near or already looking towards the spawning spot (K39) so you must be able to kill the next two ones and it should suffice. Eventually, one or two more will show up, just in front of you (you can even see them popping up, sometimes), so kill them. Once you're at the spawning spot, don't worry with new spawned enemies. The new ones were created far away from you, at Lower Town, so they will take some time until they can bother you. |
| | |
| 24. |
Now, enter the Commandant's residence and jump the window (W, on the map), to end the mission. |
If you're quick enough, you will have to face only six spawned enemies, besides the three first not-looking-like-spawned ones. So nine additional enemies for this last part of the mission. Using the approach mentioned above, I need around 45 seconds to do it, since the moment the explosives are planted, at the radio command post, all the way to jumping the window, at the Commandant's residence. It's not too many enemies, is it?
So, it was run & gun all the way but, as I said earlier, there are at least two approaches and I've described the tougher one. It can be a lot easier! How come?
You have to challenge the paradigm. You have always read about the head shots and how efficient they are. Well, not anymore. This idea came into my mind and I thought: it should work! If a new enemy is created as soon as a spawned one is killed, why to kill them? If I kill them, I'm just making sure new ones are being created so, let's NOT kill them. How? Easy! You have done it before, right here, in this very walkthrough. The answer is: shoot the leg !! That's the trick! Shoot the leg of the spawned enemies and, while they are recovering from the shot and cursing, run away from them, towards your objective. This technique works like a charm for this sub-mission. Using it, you will have to face (not to kill), besides E45, E46 and E47, only two additional spawned enemies, by the way, the only two spawned enemies ever created in the sub-mission, if you manage to follow all the steps of this walkthrough.
| 21b. |
So, follow these alternate, and recommended, steps, to achieve an easy escape:
After step 20, stay at the corner K48. Reload and quicksave. Wait for the two spawned enemies. When they show up, one behind the other, just shoot their legs (don't kill them! - pic. 23). The pistol is an excellent weapon for shooting the leg. They'll fall alive, cursing, shouting, and while they recover, RUN. You can get to the Commandant's residence without having to face no more enemy at all. |
Easy. You had to kill, or bypass, only five enemies all the way from the Communications Post to the Commandant's house.
Obs.: The town's map is based entirely on cheated screenshots. All others are real screenshots or cut from real ones.
http://www.viol.net/mohaa
Version 1.00 posted on Apr 21st, 2002.
(V.1.01 - May, 26)
All rights reserved. © 2002 by André Viol.