 |
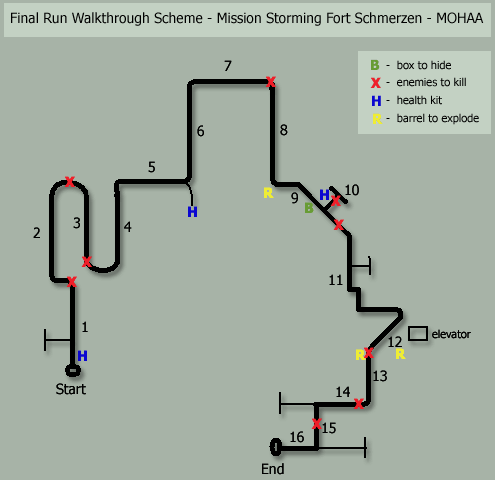
| Pic. 1 - Scheme not on scale showing the corridors and some key elements of the map. |
Storming Fort Schmerzen - Final Run - MoHAA
You have already found the way into the inner facility and acquired a gas mask. Then, you made your way to the lower level, using the elevator. At the lower level, you have opened the main gas valves and planted the explosives. Soon, this place will blow up to pieces so you have returned to the same elevator and now you have to escape. You must escape, obviously, through the same way you came in. You already know the place, it's the same one where you acquired the gas mask. You "just" have to make all the way back to the outside, except that you are not going to get out through the same door you entered (after killing the snipers at the towers and helping the Rangers to stay alive) but through a lateral exit.
See scheme below (pic. 1) to help understand more easily the steps that follow (please, note that the scheme is not on scale).
| 1. | When the door of the elevator open, fire against the two enemies that will show up at the end of the corridor, run straight ahead (do not turn left at the first entrance, it's a trap) and keep firing the two enemies until they are dead; don't forget to pass on a health pack, at the very beginning of the level, if you are in need of it; I like the Thompson better than any other weapon for this final run, but you can use the StG 44 or the Shotgun, if you prefer. This walkthrough was done specifically for the Thompson (StG 44 should be alright, also); the Shotgun requires closer shots and may not be adequate for some parts of this walkthrough. Note: if you prefer, you can shoot the two enemies while standing still, at the elevator, to have a better accuracy, and then, after they are almost dead, start to run and finish your job when near them. Don't forget to reload, soon after. |
| 2. | Without stopping, turn left, at the end of the corridor 1, and then right to go upstairs. Before making the 180-degrees-turn to the next section of the stairs, kill one enemy with some head shots. |
| 3. | Keep heading upstairs and kill the enemy that is right in front of a box, at the end of this stairs; this enemy can also be behind the box, shooting at you blindly; if he is in this position, don't waste your time trying to kill him (although he may shot you once); just keep running. |
|
| Pic. 1 - Scheme not on scale showing the corridors and some key elements of the map. |
| 4. | At the end of the stairs, turn left, then turn left again and don't waste time trying to kill the enemies; just run straight ahead. |
| 5. | Turn right at the next entrance, keep running, don't worry about the explosions, if you're on the right timing, they will not affect your health. |
| 6. | At the end of the corridor 5, at the right, there is a health pack; if you need it, just get close to it to grab it; if you don't need it (most probably and so I hope because the time you lose for this health pack may cost your life), turn left and keep running, straight ahead, reload your weapon and, if everything is going okay, quickly quick save. |
| 7. | Tricky part: At the end of the corridor number 6, you will have to turn right and soon you will face three enemies (pic. 2). The best strategy that works for me here is just keep shooting at the three enemies, aiming their heads and moving slightly the mouse from right to left to right to left, etc., like shaking the mouse, shooting the three enemies at the same time; one load must be enough or you'll be in a bad situation (that's why you saved the game soon before!); time is of the essence here and you must not waste time reloading while the enemies can shoot at you! You must manage to kill all of them without wasting any health. |
| 8. | Waste all your load in those three enemies, to have an automatic reload, and after killing them, turn right, keep running and keep shooting at the two barrels you can see from a distance, at the end of this corridor, to make them explode (you may have to slow down just a little to wait for the explosion of these barrels, while shooting); when they explode, they kill one enemy that is near them and this is important because you don't have time to kill this enemy (he is hard to kill) and he can come after you, in your trail, to shoot you from behind, if you leave him alive. |
| 9. | Tricky part again: turn left, reload, CROUCH, turn right, go quickly to the right side of this corridor, and hide behind the first box that you can see, at the right (do not hide behind the boxes at the left side of the corridor). Take care with an enemy that may be at your left (from 10), when crouched; kill him. If any other enemy approaches you, kill him. Now you can take a break, while crouched behind this box. You did all the way to here always running and you're almost there and you have done the worst part of the level, believe it! Reload your weapon and save the game. You don't have to worry about the explosions because they won't happen again until you trigger the script again, what is not going to happen now. Now, strafe slightly to the left and take a look ahead, there are plenty of enemies that will start firing at you, as soon as they see you, so, take care; strafe quickly to the right, fire, go back to the left, reload, do it again, until you kill them all (pic. 3); take care because sometimes the enemy may throw a grenade at you and the grenade will affect badly your health and will destroy the box; don't let them throw grenades, kill them before. |
| 10. | After killing all the enemies that you can, from this crouched position, you must head to the opening at your left; there is a health pack there and I bet you need it. But take care because, depending on the situation, there may have one enemy behind the boxes that exist there and he is very good at shooting. If you have any problem killing him, throw a grenade there, from your crouched position, wait for him to get out of there and then kill him easily (normally this enemy was the first one killed at step 9, but he can hide behind those box sometimes). After killing him, take care because there may have one more enemy left alive, ahead of you, so, grab your health pack, stay up (if you're crouched yet), go to the left corner, take a careful look to your left and kill any left enemy from a distance. |
| 11. | Now it's time to trigger the script again for the explosions! From the location where you got the health pack, turn left, RUN through the barrels and boxes, then turn right (script will be triggered here), run straight ahead, pass through a door, a little deviation to the left, turn left and STOP at this next door, to the right (as long as you are running, explosions are not going to affect you); DO NOT enter the new room! Wait things to calm down again, standing still at this door! Reload your weapon, if needed. You must stop in a position that you cannot see the next door, at the other side of this room (note that this room has a non-working elevator) or you will trigger some enemies to shoot at you. From this position, crouch, aim the three barrels you can see ahead and shoot them until they explode! You must be behind the door so that you will not be affected by the explosion of the barrels but not too behind because you must be able to shoot them. Reload. Then, strafe a little to the left, until you can see the door, at the other side; there may have some enemies there (pic. 4); shoot the enemies and keep shooting at that same direction until you make the barrels inside that corridor explode (even if you don't see any enemy, explode the barrels anyway!); Reload and stay up. |
| 12. | Enter the room very slowly and wait for an explosion to happen (script); watch out to your right, where there is an opening and some boxes and barrels; there must not have any enemy there, but, stay alert, just in case (some enemy, from that corridor, may have done its way to this location, eventually). Curious Note: the reader Oliver H. sent the following interesting message: "Just wanted to point something out: Storming Fort Schmerzen - Final Run, step 11, the non working elevator does kind of work. If you go straight into the room and watch it you can see the elevator carriage plummet to the ground with an unlucky scientist trapped inside. It reminds me of those scenes in Half-Life, perhaps a bit of a tribute to this game by the makers of Mohaa. Anyway, I am sure you know this, but I wouldn't want people reading your excellent walkthrough to miss this bit of action!". Well, actually, I didn't know that! This action will occur at this step, when you start entering the room, so, give it a close look. Thanks Oliver! |
| 13. | Get out of this room, entering the next corridor, that should be empty of enemies. Reload. At the end of this corridor, you should face two enemies, easy to kill. Kill them. If there is any more enemies at the end of the next corridor, kill them from a distance. |
| 14. | After killing the enemies, RUN through this corridor and take your first left. DO NOT go straight ahead, it's a dead end (and a sure death). |
| 15. | Take care when making the left turn because inside this next corridor, there is the last enemy that you must kill. Kill him, while running (pic. 5) (just enter this corridor shooting). Explosions are occurring but don't mind them. |
| 16. | At the end of corridor 15, take the right and go ahead, to the end, where you will find the wheel to open the final gate. Use the wheel to open it and go inside. End of the level. You MUST be health 100 !! |
Then, the next and last and toughest level of the game will start. If you need help, see my walkthrough for this last level here.
Obs.: There are no cheated screenshots illustrating this text, only real screenshots.
|
Hope It Helped !! |
http://www.viol.net/mohaa
Version 1.00 posted on February 13th 2002
(v.1.03 - Mar 21st, 2002)
All rights reserved. © 2002 by André Viol.