"UNDER CONSTRUCTION - version 0.9b"
The Nebelwerfer Hunt - MoHAA
Part I
Introduction
You're about to begin the last sub-mission, "The Nebelwerfer Hunt", of the third mission, "Operation Overlord", hard difficulty setting.
This walkthrough is divided into two parts (see below). Click the one you want to read but consider that the second part only applies as a sequel of the preceding one since they are interconnected:
- Part I - Killing the enemies ... (this page).
- Part II - Killing the enemies ...
During the description of the steps needed to beat this sub-mission, I'll be quoting the official walkthrough, available at EA site, as a reference (see "External Links/Alternate Guides/Official EA/Walkthroughs/Mission Three", at the top menu), so I can use the same terms. You can recognize when I'm quoting the official walkthrough because it is written in maroon.
This walkthrough was done in full collaboration with Robert Burns, from England. Our discussions about this level were very fruitful and, from them, this walkthrough was born. I'd like to thanks Robert for all his effort and help.
You have already made it through the terrifying Omaha Beach landing, you are certainly now carrying your valuable American Campaign Medal, and now you're making your way through the destroyed houses and villages of the once beautiful Normandy's countryside, in France, with the good help of Captain Ramsey. Although this is a long and tough level, it carries "just" one objective that is to "locate and destroy four Nebelwerfers".
Just as a curiosity, the Nebelwerfer (or, in English, "smoke-shell mortar") was a mobile German rocket launcher. It was developed in the early 1930s and it consisted of a six-barrel configuration of launcher tubes on a split-trial, wheeled carriage. The six rockets were electrically fired over a period of ten seconds and had a range of 6700 meters. The entire system fully loaded weighed almost 1700 pounds (770 kg) and was usually towed by German half-tracked vehicles. The Nebelwerfer had one major drawback. When it fired, it produced a brilliant flash of back blast that was not only visible from a long distance, but also required its crew to seek cover before firing the weapon. (information taken from the Internet, mainly from www.globalsecurity.org).
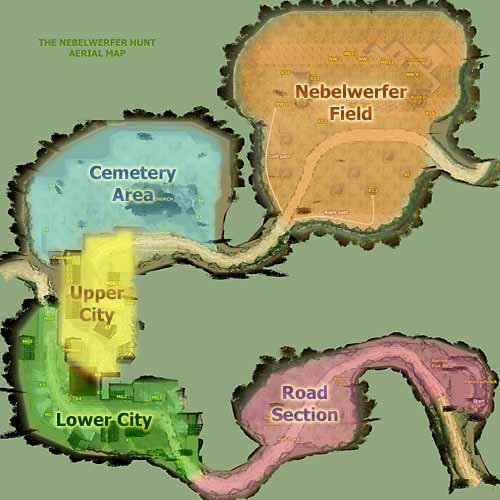
Now that you already know what you'll be pursuing, let's get to know the battlefield. To make it easier to reference key points of the whole area, a map is provided. Take a look at the Main Picture, at the end of this walkthrough (you must click the thumbnail to access the full map). It shows a complete aerial view of the level. Whenever you see a symbol between a pair of brackets in this text, search for it in the map to know what I'm talking about.
White "K" tags, along with white arrows, are used to show the main suggested path and the spots from where you're going to kill the enemies;
Green "S" tags are used to mark important spots, including alternate locations from where you can kill enemies and some locations where you should find some human enemies; note that their numbering is not connected to any logic or strategy;
Yellow tags are mainly to show non-human enemy positions like the half-track, the stationary machine guns (MGs), the upcoming Tiger tank and the Nebelwerfers; and
Orange tags are mostly explanatory ones and for other purposes, like showing the bunkers, the minefield, the trenches and some important passages.
For the sake of dividing this walkthrough into topics, the battlefield was divided into sections: the first part of it was entitled the Road Section; next, comes the burned-out city section, divided into Lower and Upper City; next comes the Cemetery Area and, finally, the Nebelwerfer Field. The map thumbnail, at the end of this page, clarifies the division.
You start the level exactly at the same place you were, at the end of the previous one: in a bypass. Captain Ramsey is with you. Select the Springfield, pick-up the Panzerschrek nearby and replenish your health, if you need. There is a 100% health pack on the crate so use it wisely: sometimes, you'd better leave it for a later use. And a great tip, taken from the LordKrell's walkthrough (see "External Link/Alternate Guides"): "You can destroy one of the small crates, next to the MG42 ammo in the alcove, for another medicinal canteen" (this tip seems not to work when in hard difficulty mode: the crates are empty).
"You'll find a Panzerschrek (rocket launcher) on the ground through the bypass immediately starting this sub-mission. Pick it up; you'll need it to take out a halftrack that you'll soon come across. As you leave the vehicle in ruins, you'll meet up with some soldiers that will tell you about the new weapons that the Germans have set up down the road. Move down the road and into the burned-out city"
| 1. | 
The three first enemies are located near the ruined Flak 88. One can shoot you before you can exit the bypass, so, crouched and with the scope on, walk near the left side of the bypass, keep looking ahead, to the left of the Flak 88, and, as soon as you see him (pic. 1), kill him. The other two Germans are behind the Flak 88 and they cannot see you, specially if you are crouched. Walk ahead carefully, strafing to the left and, always with the scope on, as soon as you see the first one of them, kill him. Strafe again to the left until you see the last one and kill him. Sometimes Captain Ramsey will help you, but if you act carefully, without rushing, usually he'll stay behind you, protected, without the risk of being shot. Although he's a tough guy, saving him from taking some bullets at this beginning of the level is a wise approach. |
| | |
| 2. |
Ahead and down the road, you'll face the half-track. You can destroy it by using the panzerschrek, as suggested by the official walkthrough, but I prefer to follow the tip that James Hudson, from England, sent me. Here's his original message: "When I was playing The Nebelwerfer Hunt recently I found that you can use the air support from the previous sub-mission once more on this section. In my case I used it on the halftrack, which leaves you enough bazooka shells to destroy the Tiger tank without picking up the extra ones in the room it destroys. Whether you can use the air strike later on (e.g on the Tiger) or indeed whether the extra bazooka shells are useful in any other way, I haven't actually tested".
This tip is really great. After you call in airstrike to destroy the half-track, you'll receive the following message: "Echo Charlie out of ammo and returning to base. You're on your own now. Good luck, over and out". It means that there won't be another opportunity to use airstrike in this level. This was your last opportunity.
So, to destroy the half-track, keep walking in the middle of the road, ready to use your binoculars (ready to press "7"), and as soon as you see the half-track coming, in the distance (or even before), set the binoculars on and, then, click the Fire button (normally the primary button of the mouse) to call in airstrike. Quickly get out of the middle of the road, take cover behind the ruined tank nearby (see the map), because the half-track will fire at you, select back the Springfield and reload it, if needed. Before the airstrike effectively takes place (pic. 2), since it takes some seconds to happen, take care with one enemy that'll try to take you down, coming from the right: kill him first, using your sniper rifle. |
| | |
| 3. | 
As soon as the airstrike is finished and the half-track is destroyed, strafe right just enough to get a clear view of the recently destroyed vehicle, set the scope on, and wait for a bunch of enemies that'll show up, getting out of the half-track or coming from the road ahead of it, and, one by one, kill them all from the distance (pic. 3). Be patient because sometimes you may think there are no more enemies to come but it may prove you were wrong. |
| | |
| 4. |
Hold your fire! 101st Airborne coming out!
- Sergeant Harrison, Pathfinders, 101st.
- Good to meet you Sergeant, I'm Ramsey, 2nd Rangers.
... ... ...
- Powell, take point. Gentlemen, move out.
Once the half-track nearby area is clean, you and Captain Ramsey will meet two Allies that'll help you complete the objective. These two extra guys, along with Ramsey, may seem sometimes tough guys and sometimes pretty weak ones. During this walkthrough, you'll be facing two challenges:
The first one is, obviously, to protect yourself while killing the enemies in order to accomplish your objective; The second one is to protect your three-men team in order to avoid losing any of them.
Due to the smart artificial intelligence of the enemies, there is no single solution to beat them. You can deal with each part of this sub-mission in some very different ways and this is what makes this level a very special one. I guess it was not without a good reason that EA chose this level to be the demo of the game: it is one of the best levels that illustrates this variety of behaviors. In this walkthrough, the main approach is to finish the sub-mission with ALL the three men alive and kicking. You'll see that, with some tricks, it'll be fairly possible to end the level with all of the Allies in good shape. |
| | |
| 5. | 
Now, do as Captain Ramsey says: move out! Reload your Springfield, quicksave and keep moving down the road, crouched, carefully, using its left side, scope on, always looking ahead and trying to see beyond the bothering leaves of the marginal bushes. There are at least two guys near the entrance of the village and, if you pay close attention, you can see them, one at a time, by seeing their feet (pic. 5). As soon as you see them, no mercy, kill them. They are agile and they'll move back and around or shoot at you when you see them, but if you're quick, you can kill them first. |
| | |
| 6. |
After these two enemies are dead, stay put and alert, always with the scope on. One or more enemies may show up, coming from the city. Kill any enemy that comes out of the fog (note that the fog got thicker, as you approached the village). Sometimes, no other enemy, besides the first two (from the last step), shows up, at this time, and, if this happen, you're an unlucky guy because you'll have to face them anyway, when entering the city under a worst scenario. Keep approaching the entrance of the city and looking straight ahead, searching for a guy under an archway, manning an MG-42: you must take him down. |
After you have killed all the possible wandering enemies by sniping them, the machine gunner included, and before entering the city, it's a good advice to be with health 100%. So, if you were hit (I bet you were) and if you didn't need the 100% health pack that was located on a crate, at the very beginning of this level (I hope you didn't), go back to the bypass and grab it. Then, return to the point you were and do not enter the city yet. Position yourself at S1, select the machine gun of your choice (I use the Thompson now), reload, stay up and quicksave. Your three men team must be all behind you, making a line. Note also that during this whole phase, specially during steps "5" and "6", the Allies were always behind you; you must have been able to keep them always behind you, protected from enemy fire.
|
Facing The Perils Of The Burned−Out City |
|
This first part of the village (named as "Lower City", in the map) is tough, but not only because you'll have to face a bunch of smart enemies coming from all over the places, but also because, as said earlier, one must think of the Allies and find the best way to avoid them to be shot and killed. They can be smart sometimes but they can also be very dumb some other times. It's up to you to find the best path to enter the city in order to face less enemies at a time. So, let's find it.
"Expect fire from the house to the right, an ambush from the left and several other wandering soldiers. Making your way down the main road, enter the house on the right."
- Tiger tank to the south! Take cover!
- Powell, try to get its attention!
- We need to trick that tank into clearing our path!
To be continued...
Click here to go to the second and last page of this walkthrough.
| Main Picture - The aerial map showing the key points used as references throughout the walkthrough. This thumbnail shows the five sections that the area was divided into, just for didactic purpose. Click the image to open the full working picture (326 kb). |
If you prefer a smaller working map (~ 75 kb), click here
Obs.: The aerial map is based entirely on cheated screenshots. All others are real screenshots or cut from real ones.
http://www.viol.net/mohaa
Version 1.00 posted on July xx, 2002.
All rights reserved. © 2002 by André Viol.