 |
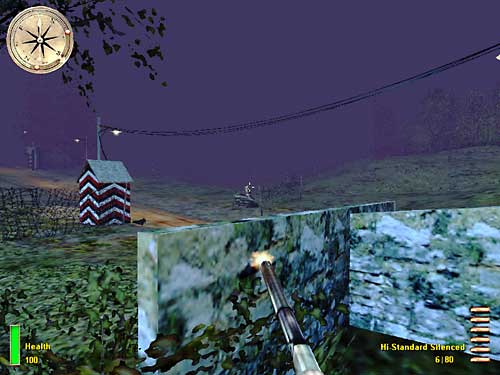
| Pic. 1 - The second enemy at the turret can be killed while jumping. Creativity even for killing. |
The Command Post - Part I - MoHAA
The Outside Area
Introduction
You're at mission four, "Behind Enemy Lines", third sub-mission: The Command Post. Hard difficulty setting.
This walkthrough is divided into three parts. Click the one you want to read but consider that a given part only applies as a sequel of the preceding one since they are interconnected:
In this mission, you have already Rendezvoused with the Resistance, after digging out the hard-to-find marquis hideout, and, with the help of your french partners, you've created some Diversion to busy the Enemy. Now, you have new objectives to complete at The Command Post. If you do all you have to do and something else, you're going to earn your fourth medal.
This is a very interesting - and also tough - level because it's a mix of two opposite approaches: stealthy mode and run & gun situation. In the first part of this walkthrough, you'd better kill all the enemies outside the houses the stealthiest way you can, otherwise you're going to face more enemies at a time than you can bear; but, on the other hand, when it's time to get inside the houses, stealth doesn't work that well anymore and you should use run & gun technique, i.e., keep running all the time and shooting at all the enemies on your way or you're history.
For this level I'm going to provide a map of the whole area to make it easier to explain the steps to beat it. Take a look at the Main Picture, at the bottom of this page; all the tags mentioned on the text are related to this picture. Also, all over this walkthrough, I'll be using the pistol, the rifle and the machine gun. If you prefer the shotgun for some described situations, just replace it as you wish. I personally don't like the shotgun.
Important Observation - This sub-mission has too many enemies - at least one hundred should be killed to finish it - working together, near one to each other, and their artificial intelligence is smart enough to make their behaviour not fully predictable. I've noticed that there is a random factor for the behaviour of the enemies: the same enemy may act a little differently to the same situation, when you replay the game, and, since there are too many of them very near one to each other, the result is that the group behaviour varies. Writing a walkthrough for this kind of mission is a tough task, specially because I understand a walkthrough as a set of steps that will guide you through a safe way to beat a given part of a game. Safe way means a reproducible way. When invading the houses, there'll be around forty enemies, with a behaviour that contains a random factor, acting together, and chances are that every time you play the level one different situation may happen. So, this walkthrough is about some ways of playing and beating the level that I came across and it should not be understood as a conclusive solution, specially for the part of the invasion of the houses (the outside area is fairly predictable). But, I believe that the techniques discussed here should be a good help. Finally, this sort of situation means that the programmers of these creatures (the enemies) did a very good job!
|
Spawned Enemies & Alarm−Oriented Behaviour |
Throughout the level, the challenge is to avoid the enemies to turn on the alarm using one of the many alarm switches there are all over the place, outside and inside the houses. The level has a fixed number of enemies but whenever the alarm is turned on, you have an extra trouble. How does it work? Here are some useful info:
Whenever the alarm is turned on, two new enemies are created immediately! I'll be calling these enemies as "spawned" enemies, from now on. The enemies that are not spawned, i.e., that already existed on the map when you started it from the beginning, will be called the fixed ones.
If the alarm keeps going on (i.e., if you don't manage to turn it off), NO other spawned enemy is created until one or both of the two current spawned enemies are killed; so, there won't be more than two spawned enemies alive, at a given time, even if the alarm is on forever. If you kill one of them, then instantly another one is created as a replacement. This situation is endless, if the alarm is not turned off.
The spawned enemies are born already knowing where you are, so, most likely (but not always) they'll head towards your location, wherever you may be.
There are a fixed number of spawning spots on the map, the spots where the spawned enemies pop up. They'll pop up in the spot that is nearest to your position. If you happen to be looking at the nearest spot by the time one of them is killed while the alarm is on, the replacement takes place at the second nearest spot, so, you're never going to actually see them popping up.
If you turn the alarm off, obviously that, once you've killed the last spawned enemies, no replacement takes place, i.e., no new ones are created (until the alarm is turned on again).
The spawned enemies, and only them, when killed, may randomly leave a 25% health canteen each, near his dead body. If you need health, grab it quickly by passing on it.
With one exception (to be discussed later), the spawned enemies do not turn alarms on. Their one and only objective is to kill you; they use machine guns, they're quick and they have a very good aiming.
So, although these darn spawned enemies are a true trouble, stay calm, whenever the alarm is turned on. Try always to be near an alarm switch to turn it off. But, you'll notice I won't always try to turn it off immediately.
Since the alarm is the best weapon of choice for the fixed enemies, you'll notice also that most of them are more worried about running to an alarm switch than about trying to kill you. The behaviour of the fixed enemies is to give highest priority to turn on the alarm, if they notice your presence. You must, at all costs, kill the enemy, when he starts to run (specially during the stealthy part of this walkthrough). Also, always before quicksaving, if you're in doubt about if some enemy noticed your presence or not, wait some time, around ten seconds, before quicksaving to be sure you don't save a game with an enemy heading towards an alarm (about to toggle it on).
|
Stealthily Killing At Area "A" |
You start the level in the back of a truck. The driver takes you to a barn. Differently from what happened in the very beginning of the game, the driver won't have any problem fooling the guy at the guard house. "Go now, quickly!", says the driver to you when the truck stops. Follow his instruction and get out of the truck, to the right, and enter the barn. You've just entered "into the lion's den" (auto-save title). Inside the barn, make your health 100%. Now, forget the shotgun, it's useless for stealthy and distant shots, and select the KAR98. Reload. During almost all this phase, DO NOT run, always walk and, when near an enemy, walk slowly.
Exit the barn through the side door. At this door (K1), stop immediately. Two enemies are patrolling the area, one to your right (E1) and one on the other side of the road, ahead of you (E2). Kill E1 when E2 is not on sight. Then kill E2 when he's far from the guys at your left. Use the noisy but very good KAR98. The other enemies, that are so sensible in some situations, don't care about it.
Now go to K3 and using that wall as a cover, kill the enemy at the guard house (E3). Don't let the guys at the turret (E4-5) see you. Don't miss the shot or E3 will turn the alarm on. Again, the KAR98 seems to be okay.
Still from K3, select the Hi-Standard Silenced pistol and jump until you get the attention of one of the enemies at the turret (E4). He'll come towards you. Kill him from behind the wall; you can see and shoot his head. Take care because he also can shoot your head. If you can't get his attention by jumping (rarely), you can shoot him, from behind the wall, while jumping (pic. 1).
|
| Pic. 1 - The second enemy at the turret can be killed while jumping. Creativity even for killing. |
If you don't want to kill while jumping, go to K5 and kill E5 from there, using the same wall as cover and the KAR98 with the scope on. Walk ahead a little, to K6 spot, and from this position, strafe a little to the right and kill the guy far away (E6). He's not even aware of your presence (yet).
Now crouch and head to the guard house in a straight path (K7). Using the guard house as a cover, with the KAR98, scope on, kill E7, then E8. E9 will notice it and head towards you. Kill him when he approaches. If you need bullets, don't forget to grab ammo from the dead guys, quickly.
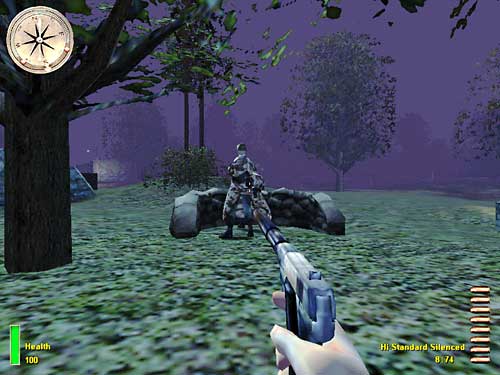
To clean the area, that I'll call Area "A", there is one last guy. He's patrolling the area near the first tent. It's not difficult to ambush him. Head towards the tent entrance and you'll see him coming from its left side. Kill him. If he's not there, he's around (his patrolling route extends up to the other side of the road).
Note: it's very possible to leave Area"A" towards Area "B" - where there are three tents, a truck parked and the watch tower - without killing any enemy. Walking crouched and using the walls as cover, just head carefully to Area "B". There are only three guys to avoid (E1, E2 and E10). You can even visit the tent, without calling any attention. Try this out, just for the sake of it.
|
The Easy Area "B" |
The three tents of this area are empty of enemies but you can find grenades, Smg rounds and health inside them. This area has only four enemies, one at the guard house (E11), two at the turret (E12-13) and one at the watch tower (E14). To kill them, you can try going through the left side, passing behind the tents, or through the right side, also passing behind the tent, and then, from a small distance, using the pistol, kill them all. The problem is that I found no way of using this approach without having the alarm turned on, by enemies at Area "C" (the outside area where the houses are located).
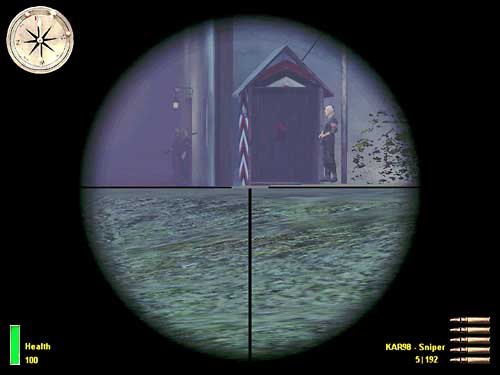
So, the solution is simpler. From K11, using the KAR98, scope on, a light pole just beside you, you can kill three of them, for as weird and unrealistic as it seems. Kill E11 first, to avoid him setting the alarm on, then E12 and E13. Piece of cake. The two guys at the turret can actually be killed with just one shot! Now pay a visit to the tents. Then, from K14 (between the guard house and the fence), using the pistol now, kill the guy at the watch tower (E14) but take care to not shoot the light, only the guy up there.
Note: again, it's possible to leave Area "B", towards Area "C", without having to kill any enemy. There is an opening in the fence (see map), at a corner near a tree, behind the guard house, that allows you to move from one area to the next without using the road. I just don't recommend because leaving enemies alive, specially these ones from Area "B", means sure future bigger problems.
|
The Dangerous Area "C" |
There are 15 enemies outside (if the alarm is not set on) and you're going to kill them all before the invasion of the houses. The first three should be killed yet from Area "B".
From K14, head to K15, walking crouched along the fence (at your right) or through the opening. If you use the opening in the fence, do not take right, after you pass through it, or E16 will notice you (there is a health back to the right but if you need it, wait until the next three enemies are killed, then come back and take it). Take the left. Stop at the left side of the crate nearest to the fence. You should be seeing only E15, that's not aware of your presence, by the way; you must not be able to see E16 because he can see you also (pic. 2).
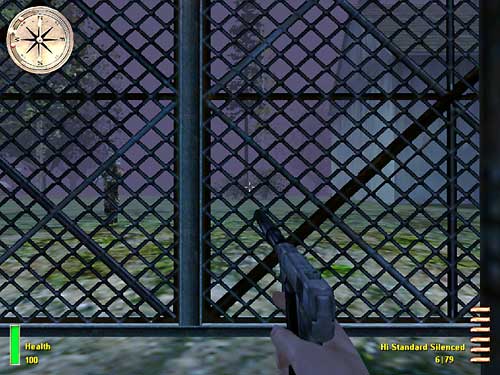 |
| Pic. 2 - When at location K15, you should be able to see only one enemy at your left, E15. |
Reload and quicksave. Now, you must be quick and aim right. Kill E15, one shot. E16 will start running towards the alarm switch near the houses. Kill him. Then, E17 will pass right in front of you, running towards the alarm switch at Area "B" (he may also head towards the alarm near the houses). Kill him. The fence makes it sort of difficult to have a sure shot but if you aim through the small holes of the fence, then it's a good shot. Note that if you miss the shot and the enemy get out of sight, running towards the alarm switch, you're in a bad situation. Quickload and try again. This walkthrough assumes no alarm will go on until the invasion of the houses. Try to kill them spending just three bullets, just for fun - and for training.
Note: there is a walkthrough, written by LordKrell, that tells us to kill these enemies from an alternate spot: K15a (behind the hangar, near the fence), using the hangar corner as a cover. Indeed, from there, you can use the KAR98 and kill first E15 (the fence is in between), while E16 cannot sees you, then strafe a little to the left and kill E16; then, with the scope on, keep walking ahead, in the direction of K15 and soon you'll see K17. Kill him also with the KAR98. Don't use the KAR98 too close to the fence or the enemies near the Tiger tank will hear it. Only in rare cases one of the enemies may try to run to the nearest alarm.
Now, pass through the gate and enter Area "C". One objective completed: you have just infiltrated the perimeter. New objectives are added:
Now it's time to kill three enemies that are guarding the two Tiger tanks. The situation is similar to killing enemies E15-E17. You have three guys, alarm-oriented behaviour, you must use the pistol, be quick and kill them all. My approach was to head to K18, near the back of the first Tiger tank, to the left. Reload, quicksave, kill E18 and stay put. E19 will hear it and most likely, after a short period of time, he'll try to shoot at you coming from the front of the Tiger tank; he may also try to run through the other side of the tank towards the alarm. Kill him, anyway. As soon as you kill E19, E20 will start, or already be, running towards the nearest alarm (this behaviour may vary). You must kill him while he's running, using the KAR98, if he's far from you (what should be the case). If anything goes wrong, try again. You can try alternate ways to kill them. Try it and have fun with the interesting and good artificial intelligence they show.
Head now to E21 spot, a guard house behind the houses. But, take the way back, passing to the right of the first house. Don't pass in front of the first and second houses yet. When walking around the houses, don't get too close to their outside walls or you may call attention. To kill E21 you may just use the pistol or, if you want to save some bullets, get very near him, from behind, walking very slowly and use pistol whipping. Pistol whipping also works fine for E22, since his back is facing the houses. Keep on going around the houses and head to E23 spot. Again, coming from behind, you can kill him with pistol whipping (or pistol shooting, if you prefer).
From the guard house at E23 spot, take the left, as if you were going to enter the third house but then take the right to get to K24 location, under the first floor of the third house. Put enemies at the turret E24 and E25 in line and kill both with just one shot of the pistol (pic. 3).
 |
| Pic. 3 - Just one shot is enough to kill both enemies at the turret near the third house. |
Go ahead, towards the exit gate, and from K26 kill the enemy there (E26). You can use the KAR98 rifle.
Now, proceed with your counterclockwise route around the house. Since the enemy at the front guard house (E27) is looking into the direction of the exit gate, you must not pass in front of the second house yet. After killing E26, head to the K27 position but walk near the edge of Area "C" (the fence). Crouched, reload the KAR98 and take a look ahead, in the direction of the houses (pic. 4). Now it's easy. Kill E27 first, then, with just one shot, you can kill, from the exact same K27 position, E28 and E29. If needed, use two shots. Note that K27 is a critical position. You can first stop near the fence and then walk ahead, in the direction of K27 little by little. You must be at a right distance from E28-E29 because once you kill E27 they'll be alert. If you're too close, they'll shoot at you; if you're too far, you won't see them; if you're at the right distance, they do nothing and you can shoot them. Rarely happens that one enemy gets out of the third house by now; if this happens, kill him from the same location. The alarm must NOT be turned on. After a while, if no alarm goes on, quicksave: the area is cleaned.
 |
| Pic. 4 - The last three outside enemies should be killed with the KAR98, from the right distance. |
Note: as a curiosity, you can kill E27 from behind and necessarily using pistol whipping but you must whip him not from exactly behind him, but a little to his left side (pic. 5) in order to not throw him ahead, when whipped, but instead, sort of backwards. I found no way to kill E28 and E29 using the pistol, though.
Now, please, click here to go to the second part of this walkthrough.
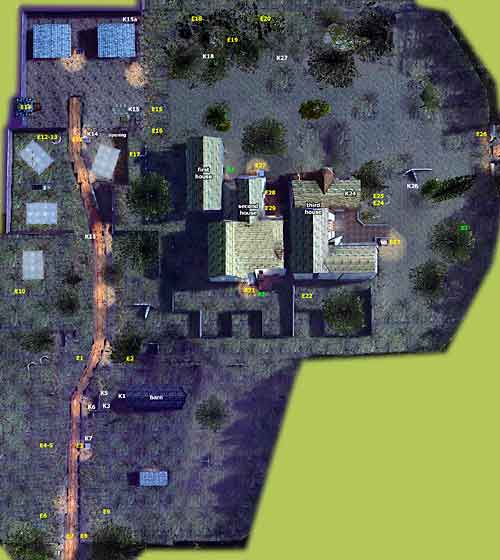 |
| Main Picture - Click the picture to access the key referenced Map for The Command Post. Please, be patient because it's a huge file with around 354kb size, so take your time. |
If you prefer a smaller working map (~ 143 kb), click here.
Obs.: Except for the Main Picture, there are no other cheated screenshots illustrating this text, only real ones.
|
Hope It Helped !! |
http://www.viol.net/mohaa
Version 1.00 posted on March 20th 2002
All rights reserved. © 2002 by André Viol.