 |
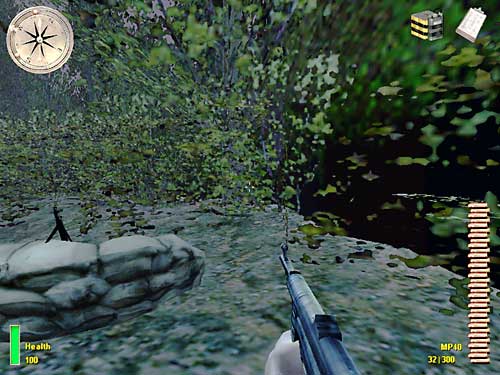
| Pic. 1 - A perfidious road, full of spawning germans & dogs, awaits you. You've got to improvise. |
The Command Post - Part III - MoHAA
Exfiltrating
Introduction
You're at mission four, "Behind Enemy Lines", third sub-mission: The Command Post. Hard difficulty setting.
This walkthrough is divided into three parts. Click the one you want to read but consider that a given part only applies as a sequel of the preceding one since they are interconnected:
You have already infiltrated the perimeter, sent the false communiquť, stolen the troop manifest and the battle plans, gathered any intelligence on the new Tiger tank, acquired the explosives and destroyed the two Tiger tanks. Now you must escape and meet up with Manon.
You're going to face a bunch of enemies, carrying rifles, machine guns, grenades and dogs, those dreadful german shepherds, before you can get to the bridge and to Manon's truck. To make conditions worst, the germans and their dogs respawn, i.e., they self-replicate, so you don't have much time to think about the situation.
|
"Cheat", Run & Gun |
So, what's the best solution? My motto is: the best solution is the one that works for you. This specific last part of the mission four is tough and the first time I did it, I used the most intuitive solution: Run & Gun, i.e., keep running and shooting at everything that moves. But this solution depends highly on luck. You have to try, try and try until you suddenly manage to beat it; of course that some tactics is always used, even with run & gun, but I wanted a solution that wouldn't depend on luck. And the solution is: CHEAT !!
|
| Pic. 1 - A perfidious road, full of spawning germans & dogs, awaits you. You've got to improvise. |
I'm not talking about using cheat codes, though, like 'dog', for being invincible. This would take out all the fun from the game. I'm talking about using failed experiences of the level to get to know it and then be able to beat it.
Let me explain. This specific part of the game is full of traitorous, disloyal events.
Once you past the exit gate, you cannot stand still because enemies will keep respawning from behind you, forever.
There is not even one single spot, along the road, to take cover from enemy fire; it's an open area.
The bushes and trees along the road makes it impossible for you to see the enemies ahead of you, unless you're already too close to them; but the enemies, behind the same bushes and trees, can easily shoot at you with a good aiming precision.
From about half the way to the bridge until you get inside the truck, german dogs will be respawning and attacking you all the time, and they are a ferocious enemy.
So, do you think you're supposed to complete this objective, at the first time you play it, against all odds?
Well, I don't think so.
You will have to try once, then you'll learn that there is a stationary machine gun ahead. You'll have to try again to find out that the guys behind you, non existent before, are endless. You'll have to try again to learn that there'll be dogs also. And so on.
Let's use this experience to beat them. The experience of knowing what to expect ahead of you. The experience of using all the resources fairly available to you, to beat them. That's the cheating I'm talking about. This is indeed what I do in all my walkthroughs, this is what we all do throughout the game, that's why there are quicksave and quickload keys, but, in this special case, I'll take the past experience to a deeper level.
|
The Road Ahead |
It's time to start our dangerous route to Manon's truck. As soon as you pass through the main gate (that was previously closed), STOP. Don't go any further. There is a stationary machine gunner far ahead of you and you'd better kill him now. Select your KAR98 Sniper rifle, stay near the guard house (pic. 1), crouch, if you want, set the scope on, aim the enemy far ahead of you (he should not be aware of your presence yet) and shoot him (pic. 2).
 |
| Pic. 2 - The first enemy to kill is the stationary machine gunner far ahead of you. Just snipe him. |
You've killed the first one. The only easy one, I should add.
This road to the bridge is not long. As you can see using the scope, the road bends in a curve to the left, at the point where the stationary machine gun (MG) is located. Near the MG, a little ahead, after the left turn, there'll be two enemies, one at each side of the road, and, a little further, another enemy, to the left. Then, the road bends in a slight curve to the right and you arrive at the bridge. At the other side of the bridge is Manon, waiting for you, with a truck.
Only three enemies, not to mention the respawning ones. The next phase will be the "cheating" part of this walkthrough. Two, out of these three enemies, can shoot at you, if you go ahead a little. Even if you cannot see them at all, due to the trees and bushes along the roadside, they can hit you pretty badly. So, you must kill them before starting the run & gun phase. I'd say that their artificial intelligence seems not to take vision as a variable or, if it takes, not to the degree it should.
|
Killing Invisible Enemies |
If you cannot see them, how can you shoot them? Not an easy task. You have to shoot at the most likely direction that you expect them to be. So, first, you need a reference spot to stand still and shoot. Walk just a little ahead from the guard house and look to your right. You'll see the guard house, a light pole and a tree trunk (pic. 3). DO NOT walk ahead of the tree trunk or you'll trigger some enemies to respawn and they will attack you from behind. If you try to get behind the guard house, you won't be able. There is an invisible barrier along the roadside. This invisible barrier makes a corner with the left wall of the guard house, just behind the light pole. You must stand at this corner, hugged to it. Facing the corner, keep pressing the forward key until you cannot move anymore, then, release the key. While you're at this corner, do not move anymore; use only the mouse to look around. Do not crouch.
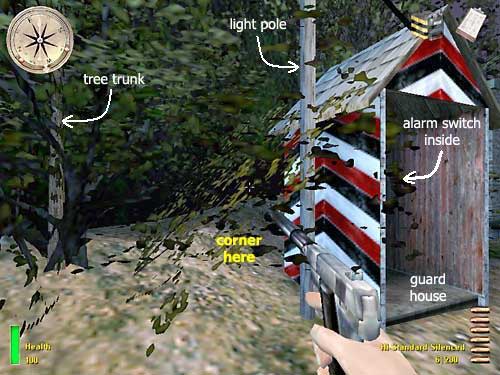 |
| Pic. 3 - The corner from where you're going to shoot blindly at the two "x-ray vision" enemies. |
Turn around and look at the road again (pic. 4). Select the MP40 and reload. Now, you're going to shoot blindly at the most likely direction those two german enemies should be.
 |
| Pic. 4 - Stay put at that corner and turn around, to look at the road again. Shoot selectively. |
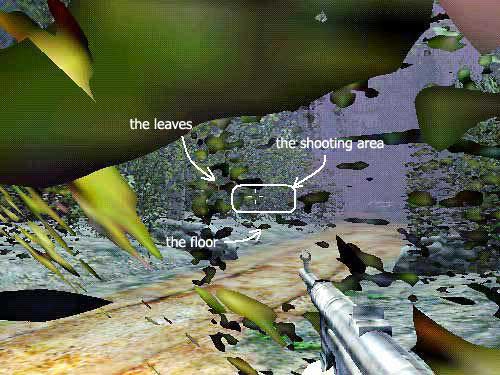
The target zone, or shooting area, is very restricted. It's located just above the floor (that light gray texture -obviously shooting the floor is useless), and to the left of the road, near some leaves (pic. 5). Note that the leaves are not still, they're constantly swaying due to the breeze, making it a little harder to mark the right shooting area. Also, the leaves seem to be randomly distributed so do not trust their position but instead pay attention to the extension of the shooting area, as shown in the picture.
 |
| Pic. 5 - You must restrict you shots to the shooting area, just above the floor level, as indicated. |
My advice is not to fire your MP40 as a machine gun, because if you keep pressing fire for the whole clip, your aiming will be jeopardised. What I do is to click Fire very selectively, one or two shots at a time, with quick clicks at the Fire button, aiming the whole shooting area, going from one extremity to the other, covering the whole area. And, VERY IMPORTANT, pay close attention to the sounds. Whenever you hear someone yelling, cursing, screaming or something similar, it means that you managed to really shot the enemy. Observe the exact point you were aiming at and fire some more shots in that direction. The enemies will not likely die with the first shot; they will crouch or fall to the ground but should get up again, ready to fire at you, after some moments (you're used to the suffering attitude the germans do when hit, aren't you?). So, while shooting, you must hear them crying out loud some times before assuming they're dead.
|
Extra Health & Ammo |
But how do I know if they are really dead? What if I run out of ammunition for the MP40?
There is only one way to try to know if you succeeded. Get out of that corner, go to the middle of the road and walk just a little ahead. Again, do not walk further than the tree trunk limit or you'll trigger the enemies to respawn. If any of the two germans are still alive, you'll hear them relentlessly shooting at you. If so, go quickly back to the corner to try again.
What if, while I'm testing to know if they're dead or not, I'm shot?
Not to worry! If you're shot (you lose 30% health for each shot) or if you ran out of MP40 ammo, you have a rather easy way to have your health and your ammo back.
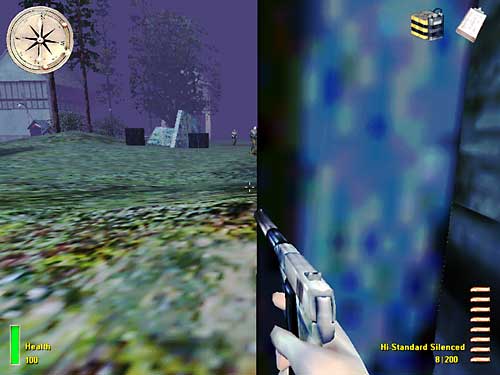
Get out of the corner and get inside the guard house. Change weapon to the Hi-Standard Silenced pistol and face the alarm switch. Quicksave. Then, turn ON the alarm. As soon as the alarm goes on, turn it OFF. Get out of the guard house and head to the main gate. Take cover at its right pillar. Two respawned (new) enemies will come from behind to see what's going on. Ambush them (pic. 6).
 |
| Pic. 6 - After switching the alarm on & off, wait the respawned enemies behind the right pillar. |
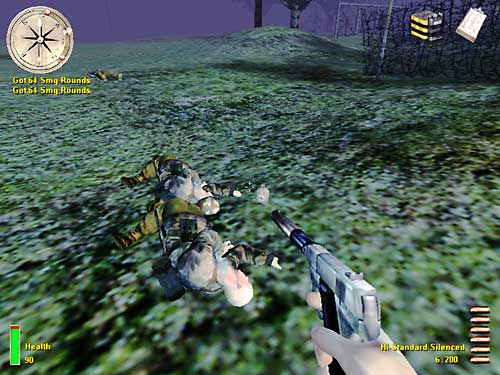
Note that these guys are agile, specially the second one to die, because he is already aware of your presence, and since they carry machine guns, he is a dangerous enemy. But, there is an easy way to kill them. Wait them to get close; then, strafe quickly to the left until you get both in line; then, one only shot with the pistol is enough if not to kill them both, at the same time, at least to hurt them both. Then, just finish the killing easily.
Since both carry machine guns, after they're dead, you can get 128 Smg rounds, 64 from each one. If you're not unlucky, you should find a 25% health bottle with one of them (pic. 7). If you're lucky, you can find two 25% health bottles, one with each dead enemy.
 |
| Pic. 7 - You can find ammo for your MP40 and, with some luck, 25% or 50% health, near the bodies. |
If you needed health but found nothing with the dead enemies, go back to the alarm switch and do the trick again. By doing this sequence, you can have extra ammunition and health enough to keep trying to kill the two germans at the road until you manage it.
Remember to leave enough ammo just to finish this level. Since it's the last one of the mission, you don't need to save for the future.
Note 1: You may use the hi-standard silenced pistol to fire at the shooting area, instead of the MP40. Indeed, this weapon is way more effective than the MP40. If you fire two clips (16 rounds) scattered all over the shooting area, chances are that you'll kill both of them. The only minor drawbacks are that you have no sound clue about the enemies being shot and there is no replacement ammo for this weapon.
Note 2: I received the following very interesting message, from a reader (Heerco G.): "If you have any grenades left in this last part, they can come in very handy. Just stand out of the range of fire as you described or crouch behind the first pile of rocks on the right (you can actually walk until this pile before enemies start spawning). If you crouch behind here you might take one or two hits, but you can compensate for that with your alarm-trick to gather some health and ammo. Now throw your grenades in the general area where you know the enemies are. If you throw them well, you can kill them quite efficiently. Another side effect is that the suckers sometimes run out to the middle of the road to shoot at you. I guess this happens when the grenade was only close enough to hurt them and their hide-out is not safe anymore. When this happens they are an easy target and youíre sure to have killed them. I hope this helpful for you, since I find it to be a nice quick solution." I have not tested the tip yet but it seems to be clearly very smart and useful a tip. Try it out !! (Thanks, H.G.)
|
Facing The Road |
Once you're certain the road is clean of those two germans, it's time to face it definitely. Just in case, don't forget to quicksave and reload your preferred weapon. I still prefer the MP40. The shotgun is good enough only for close combat.
So, RUN. Run straight ahead, in the direction of the stationary machine gun. Don't bother with the third enemy shooting at you (the one a little further on the road, to the left of the roadside). Once you get close to stationary machine gun, pass through its right side (pic. 8) and quickly turn around (you can jump the barricade, if you want).
 |
| Pic. 8 - Run to the stationary machine gun and get behind the barricade. Health pack is available. |
A german dog is coming from behind. Waste about half your clip to kill the beast (pic. 9). Note that there is a 50% health pack very near the machine gun, so, if you were hit by the third german, grab it AFTER killing the dog (passing over it)
 |
| Pic. 9 - Half clip should be enough to kill the german shepherd. |
Then, turn to your right and resume your running on the road. Take the left roadside. The third german enemy is there, shooting at you. Waste the rest of your clip to kill him, so you'll get an automatic reload of the MP40 (pic. 10). Note that this guy can fire at you stood up, crouched or laid down; he can also use grenades (the same would apply for the other two germans that you've killed blindly).
 |
| Pic. 10 - The third and last non-respawned enemy is at the left roadside, near the bridge. |
As soon as possible, go back to the road and turn around, to look to your back, and start running backwards, Another german shepherd and a bunch of human enemies are behind you. You should worry mostly with the dog, since it runs faster than you. Keep shooting at the dog and, after it's dead, at the enemies. While shooting and running backwards, you must be able to guide yourself appropriately. Use the road as your reference (pic. 11).
 |
| Pic. 11 - After killing the third german (dead at the right), run backwards while shooting. |
Even running backwards, you should have no problem to guide yourself through the bridge. The brick pavement is easily recognizable. Stay in the middle of the path and if any other dog shows up, kill it. You don't have to worry about getting inside the truck, even running backwards, since there is an invisible ramp to access it. It's not necessary to jump. So, get on the truck and you're done. Objective completed.
Note: Now, an opinion I received from a reader, Robert B.: "There is one area I did find a little easier to complete other than the description and that was the dogs in the final of the outpost. I would run to near the bridge, turn around and shoot the first hound to appear then run like hell for the truck. All of this was in hard mode" (Thanks, Robert!)
If a dog was near you, when you got inside the truck, and you spared it, it'll keep barking at you. Interesting (pic. 12)...
 |
| Pic. 12 - You can get inside the truck even running backwards. Just stay in the middle of the road. |
If you want some payback time against those nasty german dogs, instead of running in the middle of the path, to enter the truck, take the left, when you reach the bridge, and run backwards but hugged to its left wall. You'll have to stop near the truck, where an invisible barrier would avoid you to go on. Stop at this position and wait the dogs to come to get you. One by one, kill them all (pic. 13). Manon, on the other side of the bridge, will help you out.
 |
| Pic. 13 - Spend some time killing those nasty shepherds. Manon will help you, from the other side. |
Once you get tired of killing the dogs (and eventually some human enemies), or if you run out of ammo, walk a little ahead, turn around and enter the truck. End of mission.
Note that, using this walkthrough, it's very possible to finish the mission with 100% health.
Obs.: There are no cheated screenshots illustrating this text, only real screenshots.
|
Hope It Helped !! |
http://www.viol.net/mohaa
Version 1.00 posted on March 3rd 2002
V.1.03 - Apr, 27th, 2002
All rights reserved. © 2002 by Andrť Viol.